Sunday, March 11, 2007

Looms in bloom: loom knitting flowers

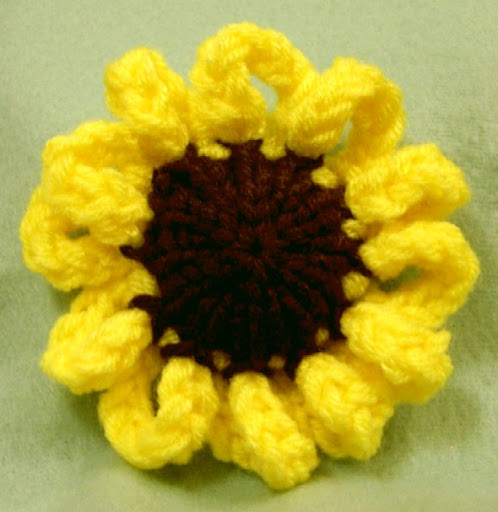
My desire to knit a flower has been germinating every since I first picked up the Knifty Knitter flower loom and last night the idea came into full bloom. When I went to bed and couldn't sleep, I tried counting sheep, but it only made me think of yarn. The next thing I knew I was playing with my flower loom. I had been toying with the idea of using the drawstring cast on to create the center of a flower after using it with the Easter egg pattern. Then when I used the I-cord stitch for the scalloped rim on the jellybean basket, I decided it looked a lot like flower petals, so I set to work to test my theory. The large sunflower above was the results of my runaway imagination. After completing the sunflower, I went to sleep dreaming of other possibilities and more flowers.

Today ended up being "car trip" day, which means time to loom knit. I tested various looms and changed the number of rows each time. The picture below shows the flowers I made during the car trip pictured with it's corresponding loom, along with the "bedtime" sunflower. The daisy & black-eyed Susan were made with the spool loom: the daisy on the eight peg end and the black-eyed Susan on the five peg end. The large daisy and the sunflower were made on the twelve peg flower loom.
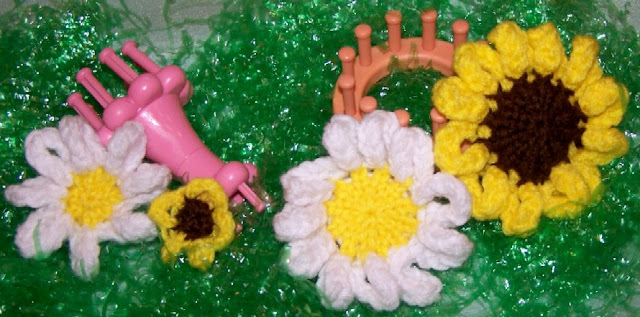
I do not recommend the spool loom for your first flower. It's very cumbersome to work with, especially on the five peg end where the inside loom opening is very narrow. The twelve peg flower loom produced the best flowers, but they are also quite large having a four & one-half inch diameter.

How to grow sunflowers on the flower loom
Unfortunately, I'm pressed for time right now and will not be able to write a detailed pattern until I return from vacation at the end of the month. However, you will find the flowers quite easy to make if you are familiar with my drawstring cast on method (see the Easter egg pattern) and the scalloped I-cord stitch trim I used in the little jellybean basket. Do a drawstring cast on using the twelve peg flower loom and two strands of Red Heart worsted weight yarn in brown or your chosen color. Flat knit Rows 1-4 and on Row 5 do e-wrap knit stitches. Cinch the center opening shut by pulling on the initial yarn tail from the drawstring cast on. Pull the yarn tail to the inside and tie off. Change yarn colors to two strands of bright yellow. Row 6 consists of a nine stitch I-cord pattern. On Row 7, lift the ladders from Row 5 to do a hang-hem, then knit the bottom loops over the hang-hem loops. Row 8 is an e-wrap knit stitch row and Row 9 is the flat panel bind off row. End by tying off, securing and trimming all yarn tails.

Experiment on your own using various yarns and modified stitches. Be sure and share pictures of your accomplishments so we can all learn from them. The possibilities are endless.

Friday, March 09, 2007

A tisket, a tasket, a jellybean basket

OK, I'm in panic mode. I have so many ideas and so little time to do them. We are getting ready to go on vacation to Argentina and Uruguay for ten day and since I've been playing with the looms I've let my laundry go to.....well, it's pretty bad. Anyhow, this will probably be my last blog post until I return. Of course, I'm taking a few looms and some yarn - you didn't think I could actually go that long without them, now did you?

Of all the little loomies I've make, I believe this one is my favorite. The little Jellybean Basket is made on the Knifty Knitter flower loom and the handles are done on the five-peg end of the Knifty Knitter spool loom. The completed basket is about 4.75 inches tall. Of course, the basket design wouldn't be possible if I hadn't made it's perquisite designs. The cupcake contributed the flat bottom and the Easter egg improved on the flat bottom by using the drawstring cast on method.

Also, my treetop angel, Anabelle, started me using the I-cord for a scalloped edge. The scallops are much more polished in this basket design, because it is integrated directly into one of the rows as a stitch pattern. I considered integrating the I-cord handle directly onto the basket, but decided not to push my luck this time.

I also tried different stitch patterns to create a type of basket stitch (see the two pilot baskets pictured to the right), but I decided to stay with a flat knit stitch in the end. Even though the stitch patterns didn't suit me, The flat bottoms looked pretty good. (see left).

The basket looked good without it, but to help keep its shape when adding goodies, I cut the bottom from an eight ounce plastic drinking cup and inserted it into the basket bottom. I used Easter grass, small jellybeans and a Peeps marshmallow bunny to decorate.

The pattern is listed in the right sidebar under My Pattern Box, or by clicking here. By using a larger loom and increasing the number of rows, this little basket could easily be made into a larger design. If I were making it larger, I would probably make 3 sets of I-cord for the handle and braid them for reinforcement. You would also need to find a small plastic bowl to insert into the bottom to help maintain the shape. However, I like the little basket just the way it is, because to me it's the small things in life that matter most.

Monday, March 05, 2007

The Easter egg reborn

When you see Easter eggs, a symbol of fertility and rebirth, you know that spring is near. In an effort to hurry it along, I decided to loom knit some Easter eggs. I used a plastic egg for stuffing to maintain the "egg shape", but I soon discovered another problem in what would appear to be a fairly simple project. The problem was the appearance of the bottom of the egg when using traditional loom knitting cast on methods. All the traditional methods I tried produced surface stitches or bunching when the bottom opening was cinched shut.

After some experimenting, I created what I call the "drawstring" cast on. This cast on is created by anchoring the working yarn and then wrapping it completely around the loom once. The working yarn is then held across the top of the peg on the first or odd peg while the bottom strand of yarn is flat knitted OVER the working yarn. On the next peg or even peg, the the working yarn is laid across the peg, but the bottom strand of yarn is hooked UNDER the working yarn and lifted over the peg. To complete the cast on, continue lifting the bottom strands of yarn OVER the working yarn & peg on all the odd pegs, and UNDER the working yarn & over the peg on all the even pegs, until the last peg in the row has been reached. The beginning yarn tail forms a drawstring which can be cinched to completely close the bottom. This drawstring cast on would be good when making loom knitted toys or flowers.

The egg was made on the Knifty Knitter flower loom and completed by flat knitting 16 rows and doing a gathered bind off, leaving the top open so the egg can be inserted. Detailed instructions for this Easter egg can be accessed here, or in the pattern box on the right.

Tuesday, February 27, 2007

Loomed leghorn: an egg cozy

It's official, I have spring fever! All I can think about are springtime looming projects. I've got patterns brewing for all types of baskets, bunnies, ducks, chicks and eggs. You could say that I'm "egg-cited" over all the possibilities.

Making an egg cozy
To start things off, I whipped up a little leghorn hen egg cozy that will fit nicely over an egg: both real and plastic. I just happened to have a bag of plastic Easter eggs that I bought on sale a few years ago stashed in my craft supplies, so that's what I used. The hen is loomed on the Knifty Knitter 12 peg flower loom. I did a chain cast on using a medium tension and two strands of worsted weight yarn and then with a flat knit stitch I worked K1/P1 rib stitch for 4 rounds.

The body & head
The body is done in alternating flat knit & purl stitches for 12 rows to form a garter stitch pattern, then I did a flat panel bind off on 6 pegs and continued with the garter stitch pattern for 6 more rows of flat panel work on the remaining 6 pegs to form the head. End by doing a flat panel bind off, remove the hen from the loom and whip the head & back opening shut.

Finishing
The beak, cone and tail trim are made using crochet chains in the corresponding colors and whip stitched in place. Small googly eyes were added for the eyes, but little black buttons or beads would work nicely. If the number of rows for the hen's body is reduced, the cozy could be used with a Cadbury Egg.

Note: A detailed pattern can be found by clicking the link for the Loomed Leghorn Egg Cozy in My Pattern Box on the right sidebar.