Wednesday, April 04, 2007

Blossom, the hip-hop flower bunny

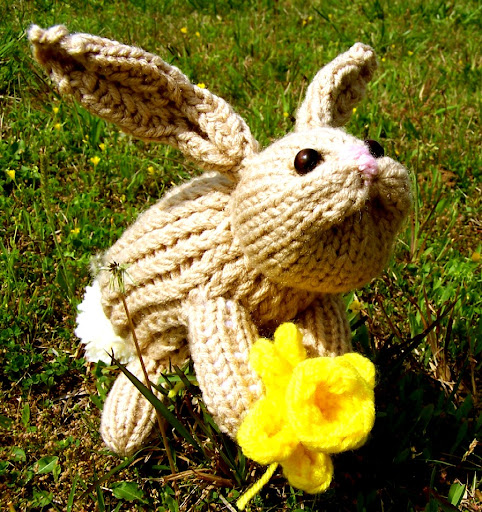
Stand me in the corner, because I'm a bad student. I was suppose to be working on Ann Bipes Easter Bunny for LoomClass this week, but I had already started my own bunny design on the Knifty Knitter blue loom a few days earlier. The blue loom was the loom needed for the LoomClass project so I knew I was in trouble. I only had a few rows of my own project completed on the loom and could have removed it to do the assigned project, but I had several new techniques that I wanted to experiment with and I was afraid if I didn't do it while it was still on my mind that I would completely forget. The results of my bad behavior is Blossom Bunny, a loom knitted bunny with a soft sculpted face.

As stated earlier, Blossom was made on the 24-peg blue Knifty Knitter. Starting at the tail end, I used a drawstring cast on (see the Easter egg pattern), worked six rows of flat knit stitch, plus two rows of u-wrap stitch and then closed the bottom area using the drawstring. The largest part of the body was completed with eighteen e-wrap rows. For the neck area, I decreased using the flat knit stitch by k2tog across the row. When I reached the end of the row, I cut the working yarn leaving a six inch yarn tail. Decreasing this much on a loom is usually a problem, but by working the decreases using a flat knit stitch the tension can be adjusted to accommodate the stationary pegs while knitting and later by using the cut yarn tail as a drawstring.
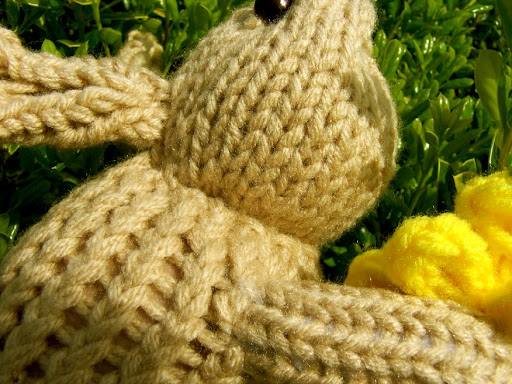
Leaving another six inch yarn tail in the new working yarn, I continued to flat knit the twelve pegs with loops and cast the working yarn on over the empty pegs. On the next two rows, I flat knit all twenty-four pegs to complete the neck area of the head. Continuing with the head, I worked twelve rows of u-wrap stitches, three rows of flat knit stitches in the nose area and ended with open gathered bind off.

The body is stuffed with fiberfill using a knee high stocking as a liner. The neck area is cinched from the inside to the desired size using the yarn tails and then tied off. Pull the stocking liner into the head area and continue stuffing. When the stuffing has been completed, the gathered bind off is cinched shut and tied off.

Other parts include the legs, ears, tail and face. The legs were knitted from feet up using the drawstring cast on and sixteen rows of flat knit stitches on the 8-peg end of the Knifty Knitter spool loom. The ears were worked as a flat panel on the blue loom starting with eight rows of six stitches, then increasing a stitch at the beginning and end of row nine and knitting a total of eight rows with eight stitches. The ear is completed by k2tog at the beginning of each row until only one stitch is left on the peg. The tail is a big white pompom stitched over the initial cast on spot. The face is soft sculpted, which really brings the bunny to life, with a pink embroidered nose and big brown wooden beads for eyes.

Now that Blossom has been completed, I'll do the Anne's Easter Bunny so Blossom will have a friend.

UPDATE: Here's the Easter Bunny from Loom Class:

Friday, March 30, 2007

Looms in bloom: daffodils

We returned from Argentina this past Saturday from a wonderful vacation to what has been a disastrous week at home. The terrible events of this past week are too numerous and unbelievable to list and even though I couldn't find the time to knit, I knitted in my mind while riding or driving from one place to another or laying in the bed as my prequel to sleep. Bright yellow daffodils, the fruit one of my mental knitting exercises, finally materialized in yarn form late last night. These little beauties were made on the eight peg end of the Knifty Knitter spool loom. The basic steps to making this flower, which is made from the top down, are as follows:
  • Using two strands of yarn as one, do a chain cast on using all eight pegs of the spool loom. The cast on edge forms the lacy lip of the "cup" on the daffodil.
  • Flat knit for eight rows.
  • For the petal, work an eight stitch I-cord between six of the pegs. (Instructions for the I-cord stitch technique are outlined in the jellybean basket pattern). Due to the narrow opening in the center of the spool loom, I had to pull the I-cord "petals" to the outside between the pegs as I completed each petal. The best loom for this project would be a regular gauge six peg spool loom with a standard opening in the center. I've not seen one with these specifications available anywhere, but Noreen Crone-Findlay's spoolies come close. Eventually, I may get brave and just make one, but for now the little pink KK spool loom was the loom of choice from what I had laying around.
  • Do a hang hem by lifting the ladders between the pegs from row eight of the flat knit row onto corresponding pegs. This step was difficult, because there is so much bulk in the small opening of the KK spool loom that it is hard to determine which strands of yarn you need to be lifting. Therefore, if you guess incorrectly, you will need to touch up your mistakes with the yarn needle at the end of the project.
  • Flat knit for one more row.
  • Do a gathered bind off. Cinch the yarn tail tightly and tie off leaving a 12-inch tail.
  • Thread one strand of the yarn tail on a yarn needle for doing touch ups.
  • Finishing touches include running a gathering strand at the base of the"cup" and tightening it to make it smaller at the bottom. Also, depending on how good your guess was on lifting the ladders when you did the hang hem, you may need to cinch the vertical space between the petals.
These are actually fairly easy to make. The biggest aggravation was the compromises that had to be made for the inadequacy of the loom. Now all I need to do is buy some emerald green yarn to make stems and leaves.

Sunday, March 11, 2007

Looms in bloom: loom knitting flowers

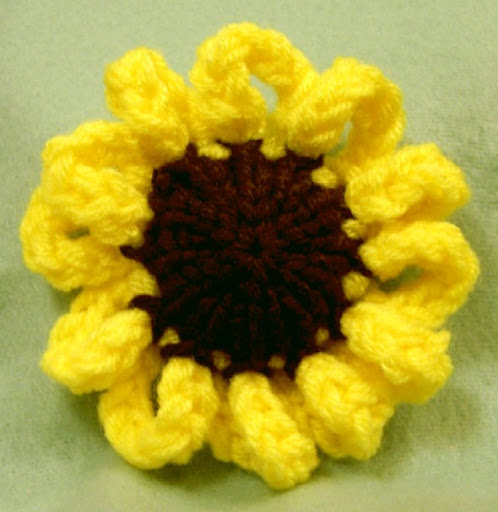
My desire to knit a flower has been germinating every since I first picked up the Knifty Knitter flower loom and last night the idea came into full bloom. When I went to bed and couldn't sleep, I tried counting sheep, but it only made me think of yarn. The next thing I knew I was playing with my flower loom. I had been toying with the idea of using the drawstring cast on to create the center of a flower after using it with the Easter egg pattern. Then when I used the I-cord stitch for the scalloped rim on the jellybean basket, I decided it looked a lot like flower petals, so I set to work to test my theory. The large sunflower above was the results of my runaway imagination. After completing the sunflower, I went to sleep dreaming of other possibilities and more flowers.

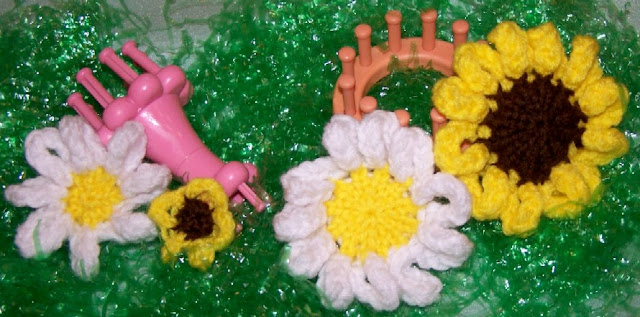
Today ended up being "car trip" day, which means time to loom knit. I tested various looms and changed the number of rows each time. The picture below shows the flowers I made during the car trip pictured with it's corresponding loom, along with the "bedtime" sunflower. The daisy & black-eyed Susan were made with the spool loom: the daisy on the eight peg end and the black-eyed Susan on the five peg end. The large daisy and the sunflower were made on the twelve peg flower loom.

I do not recommend the spool loom for your first flower. It's very cumbersome to work with, especially on the five peg end where the inside loom opening is very narrow. The twelve peg flower loom produced the best flowers, but they are also quite large having a four & one-half inch diameter.

How to grow sunflowers on the flower loom
Unfortunately, I'm pressed for time right now and will not be able to write a detailed pattern until I return from vacation at the end of the month. However, you will find the flowers quite easy to make if you are familiar with my drawstring cast on method (see the Easter egg pattern) and the scalloped I-cord stitch trim I used in the little jellybean basket. Do a drawstring cast on using the twelve peg flower loom and two strands of Red Heart worsted weight yarn in brown or your chosen color. Flat knit Rows 1-4 and on Row 5 do e-wrap knit stitches. Cinch the center opening shut by pulling on the initial yarn tail from the drawstring cast on. Pull the yarn tail to the inside and tie off. Change yarn colors to two strands of bright yellow. Row 6 consists of a nine stitch I-cord pattern. On Row 7, lift the ladders from Row 5 to do a hang-hem, then knit the bottom loops over the hang-hem loops. Row 8 is an e-wrap knit stitch row and Row 9 is the flat panel bind off row. End by tying off, securing and trimming all yarn tails.

Experiment on your own using various yarns and modified stitches. Be sure and share pictures of your accomplishments so we can all learn from them. The possibilities are endless.

Friday, March 09, 2007

A tisket, a tasket, a jellybean basket

OK, I'm in panic mode. I have so many ideas and so little time to do them. We are getting ready to go on vacation to Argentina and Uruguay for ten day and since I've been playing with the looms I've let my laundry go to.....well, it's pretty bad. Anyhow, this will probably be my last blog post until I return. Of course, I'm taking a few looms and some yarn - you didn't think I could actually go that long without them, now did you?

Of all the little loomies I've make, I believe this one is my favorite. The little Jellybean Basket is made on the Knifty Knitter flower loom and the handles are done on the five-peg end of the Knifty Knitter spool loom. The completed basket is about 4.75 inches tall. Of course, the basket design wouldn't be possible if I hadn't made it's perquisite designs. The cupcake contributed the flat bottom and the Easter egg improved on the flat bottom by using the drawstring cast on method.

Also, my treetop angel, Anabelle, started me using the I-cord for a scalloped edge. The scallops are much more polished in this basket design, because it is integrated directly into one of the rows as a stitch pattern. I considered integrating the I-cord handle directly onto the basket, but decided not to push my luck this time.

I also tried different stitch patterns to create a type of basket stitch (see the two pilot baskets pictured to the right), but I decided to stay with a flat knit stitch in the end. Even though the stitch patterns didn't suit me, The flat bottoms looked pretty good. (see left).

The basket looked good without it, but to help keep its shape when adding goodies, I cut the bottom from an eight ounce plastic drinking cup and inserted it into the basket bottom. I used Easter grass, small jellybeans and a Peeps marshmallow bunny to decorate.

The pattern is listed in the right sidebar under My Pattern Box, or by clicking here. By using a larger loom and increasing the number of rows, this little basket could easily be made into a larger design. If I were making it larger, I would probably make 3 sets of I-cord for the handle and braid them for reinforcement. You would also need to find a small plastic bowl to insert into the bottom to help maintain the shape. However, I like the little basket just the way it is, because to me it's the small things in life that matter most.