Showing posts with label ornaments. Show all posts

Friday, June 29, 2012

Lovely loopy flowers

Red Loopy Flower with leaves added as a hair accessory.

Yahoo's LoomClass Group
is just finishing up a class that features my Patriot Pin from last year and I thought I would share with you a pattern that sort of evolved from that pattern called the Loopy Flower pattern. I made a couple of these for my husband's mother and aunt for Mother's Day brooches in white Homespun and lavender worsted weight.

Loopy Flowers as Mother's Day brooches

Then I got carried away experimenting with different techniques, yarns and alternate color combinations. Originally, I called this particular style of flowers "Hawaiian Star Flowers" because of the pretty color combinations and shape.
Hawaiian Starflowers

I was going to include the instructions in this blog post, but I decided to write it up as Loopy Flower PDF. That way I can actually find it when I get ready to make more.

Now, go out and loom a yarny garden! 

Pink & White Loopy Flower

Wednesday, December 03, 2008

Christmas egg


Are you looking for a way to be green, or environmentally correct, this season? How about recycling one holiday decoration for another? That's exactly what I decided to do when a friend of mine gave me a very large box of plastic Easter eggs in assorted colors and sizes. The picture above is an example of one of the large Easter eggs after it became a shiny new Christmas tree ornament. All you need is a little Needloff metallic cord, the Easter Egg pattern posted on this blog, and about 30 minutes. The egg is once again reborn (post 3-5-07)!!

Monday, November 10, 2008

It's time to make the ornaments!

Belle Angel
In case you haven't noticed, I love knitting small items and what fits into this category better than holiday ornaments? They are sort of like the microcosm of the knitting world. You can experiment with new techniques without the fear of making huge mistakes. It's much less stressful to frog something that took only a couple of hours to knit as compared to an item that took weeks to knit. Another advantage to making these miniature wonders is that you can really spread the love by giving more of your friends something you made yourself. Who says happiness doesn't come in small packages?

This fall I've been showing others how to spread the love by teaching ornament classes on the Yahoo LoomClass Group and the Beginning-LoomKnitting Group. The classes taught for LoomClass include three ornaments in each class. Bell Ornaments Class, which was taught a couple of week ago, featured Knifty Christmas Bells, Bright Bells, and a new pattern called Belle Angel. I made the first Belle Angel two years ago and wrote about it in this December 2006 post, but had never written the pattern until recently. The new Belle Angel (pictured above) is a little more sophisticated that her predecessor, but the original Belle holds a special place in my heart.

I-cord Ornaments, the second LoomClass ornament class, is currently in session. Ornaments for this class include Candy Canes, Mini-Christmas Wreaths and another new pattern called Bright Star. The little star is designed specifically for the 5-peg end of the Knifty Knitter Spool Loom.
Bright Star Ornament
The Lace Ornaments class, coming up on 11/30-12/06, is the last of the ornament classes for LoomClass. The ornaments taught in this class will be the Victorian Lace Ornament, Lacey Snowflake and a Basic Shortrow Snowflake. The first two patterns are already available, but the Basic Snowflake pattern will be posted the day before the class begins. In the meantime, I'll include a picture in this post.

Basic Shortrow Snowflake

The class I am teaching for the Beginning-LoomKnitting Group (11/24-28) is a Snowflake Angel. I'm very proud of the way this particular angel is designed. Her wings and skirt are all one piece with her arms woven into a row of mock crochet stitches in the wings. The pattern is located here and in the Pattern Box to the right. Here's a picture of my Snowflake Angel:

Snowflake Angel

One thing that both angels have in common is what I call a "picot cast on" at the beginning edge of the skirt. This is an a technique I've created for the looms that allows you to make a picot edge. I use a similar technique when binding off the wings on the Snowflake Angel. I will talk more about the picot technique in upcoming blog posts.

Monday, December 17, 2007

Bright bells

After making the Victorian Lace ornaments, I had some of the metallic colored Needloft Craft Cord left over. To me, the colors of the metallic cord are reminicent of the 40's vintage Shiny Brite ornaments. So with this in mind, I designed a little bell that is not only super quick to make, but has two different styles of rims. Last year I wrote a pattern for Knifty Christmas Bells, but this bell is even quicker, easier and more fun to make than the Knifty Bell.

Very similar in design to the little Halloween ghost, Boo-Ella, the Shiny Bright Bell is made from the top down using the drawstring cast on, nine rows of flat knit stitch, one row of e-wrap stitch, and your choice of two styles of rims.

The first style rim, the fastest of the two, is the garter stitch rim which is made by alternating the last three rows with purl & flat knit stitches, then finished with a basic flat panel bind off. You can also add a little variety by using a contrasting color cord to create a stripe. The gold bell pictured on the left has a red cord added on rows 6-8 for the stripe.

The second style rim uses the I-cord bind off to create a little flare. You can vary the number of stitches in the I-cord to suit your taste. The white bell pictured on the right was made using Needloft white/silver and a 3 stitch I-cord edge. This style is not only good for holiday ornaments, but when done in white it makes a very nice wedding decoration.

The free pattern is located here and in the Pattern Box on the right sidebar.

Friday, December 07, 2007

Poinsettia on the knitting loom

The poinsettia, or flower of the Holy night, is based on a Mexican legend which you can read about here. While technically not a flower, its beauty rivals that of any flower I know. If you are a regular reader of my blog, you know of my love for creating flowers on the knitting looms and since it is the holiday season I just had to experiment with creating a poinsettia. I've not formally written the pattern, because I really don't know how much interest there is making these. Instead, I will give a description of how I made my poinsettia in this blog post.

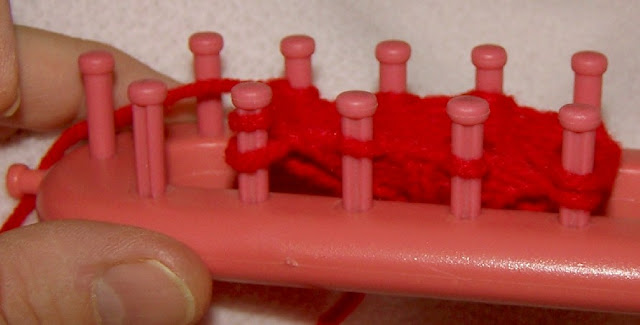
The red leaf of the poinsettia began with a drawstring cast on (see Easter Egg pattern for drawstring cast on directions) on the little pink Knifty Knitter long loom using the first 12 pegs as a round loom.

Drawstring cast on: beginning and completed

After casting on, I knitted (
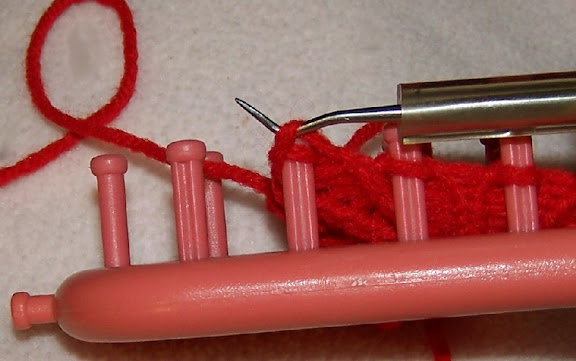
flat knit stitch) for nine rows. The gap between the two rows of pegs creates a loose tension that constantly needs to be adjusted. When about seven rows have been completed, cinch the cast on edge shut.

Closing the cast on edge

Before beginning the tenth row, decrease the stitches at each corner by lifting the outer corner loop and placing it on the neighboring peg. You now have eight pegs with loops (four pegs on each side of the loom). The bottom loop on the four corner pegs is knitted over the decreased loop to give the illusion of a little spike edge on the leaf.


Decreasing at the corners and knitting the decreased peg

After the first decrease, knit five more rows and decrease as before. This will leave four pegs with stitches. Knit four more rounds on the four remaining pegs then do a gathered bind off. Be sure and adjust the tension on the loops prior to binding off. Cut the working yarn leaving an eight inch tail. Use a crochet hook to work the yarn tail around one side of the leaf all the way to the base. Tie a square knot using the yarn tail and the cast on tail, then trim the tails. The completed leaf should look similar to this:
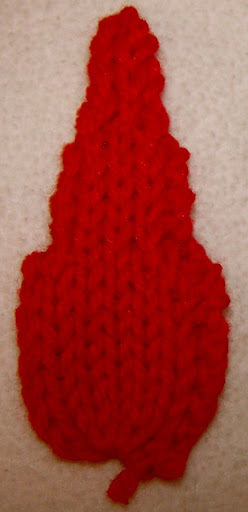

Completed red leaf

When six red leaves have been completed, use a yarn needle, pinch the leaves at the bottom and join all six leaves at the base like this:


Completed leaves shaped and joined

The cyathium, or yellow center, is formed using one strand of yellow yarn and fifteen yellow beads. Thread the fifteen beads on the strand of yarn prior to knitting. Using the five peg end of the pink Knifty Knitter spool loom, do a drawstring cast on. Knit two rounds adding a bead to each stitch. Do a flat panel bind off, adding a bead to each bind off stitch. Cinch the cast on edge shut then whip stitch the cyathium where the red leaves are joined at the center of the flower.

Make six green leaves by increasing the rows from the red leaf instructions as follows:

  • Knit ten rows on twelve pegs; then decrease to six pegs
  • Knit eight rows on the six pegs; then decrease to four pegs
  • Knit six rows on the four pegs; then bind off.
The green leaves are joined by overlapping the edges instead of pinch pleating as you did with the red leaves. The joined green leaves should look similar to this:
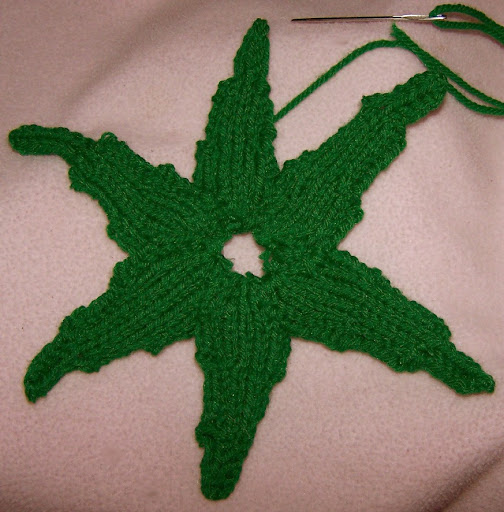

Joined green leaves

Complete the poinsettia by placing the red leaves on top of the green leaves so the green leaves show between each pair of red leaves and whip stitch in place. The finished poinsettia is approximately eight inches in diameter.

Thursday, November 29, 2007

Victorian lace ornament, a touch of elegance

Although I could never afford to buy one, Faberge ornaments are the most beautiful of all holiday items. With that in mind, I decided to create a "little touch" of Faberge style on the Knifty Knitter Flower Loom. The result is what I call a Victorian Lace Ornament, similar in design to this Faberge Coronation Ornament that sells for about one hundred bucks.

Since my design is made with metallic cord from the craft department at Wal-Mart and shatterproof (translates as plastic) ornament balls, these will only set you back about fifty cents each plus your time. As with most of my projects, these make up very fast. Also, the lace ornaments would make a nice little extra gift for someone special and best of all, no one has to know how cheap you really are. The pattern is available here or in my Pattern Box on the right.

This project was also featured in Craftzine here.

Wednesday, November 07, 2007

Loom knit snowflakes, a lesson in I-cord bind off

When I posted Boo-Ella I promised to follow up on the new technique I developed for the ruffled edge of her skirt which I call the I-cord bind off. It is really very easy to do and creates a nice picot edge that could be used on baby items or any place you want a little added decoration.

Since I've had a number of folks email me asking for the snowflake pattern, I decided to design a snowflake that incorporates the I-cord bind off on the outer edge. I knitted Snowflakes on the Loom last year, but this snowflake design is very different from those. They were made using short row shaping and the new one is made completely in the round on the 12 peg Knifty Knitter flower loom. I never posted the instructions for those snowflakes, because they were actually a translation of a needle knitted design from a book, Knitted Snowflakes. The new snowflake is not only my original design, it is much quicker and easier to make; plus you have a mini-lesson, free pattern and a finished project all rolled into one. The pattern is located here and is posted under Pattern Box in the right sidebar. Hopefully, you will enjoy making and displaying these as much as I did designing them for you.