Showing posts with label stitches. Show all posts

Monday, November 07, 2011

Indian Corn Hot Pad

Indian Corn Hot Pad or Potholder
Remember the Indian Corn project from last November, where I used the reverse side of the linen stitch to create the "Indian corn" look. Well, I liked this stitch so much that I decided to design a large (9 inches square) super thick Thanksgiving hot pad or potholder around it this year and I'm really pleased with the results.

The Indian Corn Hot Pad was designed for the 36-peg large gauge round loom, but could easily be adapted to any of the large gauge looms with an even number of pegs. Also, I used double worsted weight (8 ply) 100% cotton yarn by Peaches & Creme in Shaded Brown, which is the equivalent of using two strands of the regular 4 ply cotton yarn. The double worsted weight Peaches & Creme yarn is hard to find, but it is a joy to knit with on the large gauge looms.

Construction of this hot pad is a little different from any I've seen elsewhere. It is made in the round using the 36-peg large gauge round loom, but since the reverse side of the linen stitch was used for this project, I placed markers on pegs 18 & 36 and purled these pegs. When the hot pad was removed from the loom and turned inside out, the purled pegs formed a chained or braided stitch pattern along the sides which helps define and maintain the flat square shape. The tube is flattened and closed along the cast on and bind off edges using any form of grafting technique or slip stitch crochet. This is an easy way to create a super thick hot pad using a variety of stitch patterns that might otherwise be difficult to do a knitting board.

Indian Corn Hot Pad

Materials
  • Large gauge round looms with even number of pegs & loom tool
  • Yarn: 100% cotton worsted weight or double worsted weight in variegated shades of brown
  • 2 stitch markers
  • Other supplies: scissors, crochet hook, yarn needle
Gauge: 8 stitches X 16 rows = 4 inches

Finished Size: 9 inches (36-peg loom); 7 inches (30-peg loom) or 6 inches (24-peg loom)

Linen Stitch Sequence (Modified for this this pattern. A detailed explanation of this stitch, which is typically used on an odd number of pegs, can be found in the Indian Corn pattern.)
  • Sequence A: k1, *sl1 wyif, k1; repeat from *
  • Sequence B: sl1 wyif, *k1, sl1 wyif; repeat from *
Close-up: Linen stitch reverse side
Instructions for 36-peg large gauge round loom
  1. Place markers on pegs 18 and 36.
  2. Cast on all pegs in the round using one strand of double weight or two strands of regular worsted weight cotton yarn.
  3. Round 1: Work stitch sequence A on pegs 1-17; p1 on peg-18; work stitch sequence A on pegs 19-35; p1 on peg-36.
  4. Round 2: Work stitch sequence B on pegs 1-17; p1 on peg-18; work stitch sequence B on pegs 19-35; p1 on peg-36.
  5. Repeat Rounds 1 & 2 until hot pad measures 9 inches (approximately 36 rows) from the cast on edge.
  6. Bind off loosely and remove from loom.
  7. Turn knitted tube inside out since the inside will be considered the right side.
  8. Shape into a double flat square by folding along the purled side stitches.
  9. Close the cast on and bind off edges by either stitching using a yarn needle or slip stitch with a crochet hook. 
  10. Optional: Chain or I-cord a hanging loop in one of the top corners of the square.
 Enjoy and use when things are too hot to handle!

Tuesday, January 30, 2007

Mock crochet…what are you mocking?

A recent response on the rakeknitting Yahoo Group about my lacy scarflet which was loom knitted using a stitch called the “mock crochet” stitch left me wondering which crochet stitch is being mocked. After all, I have crocheted for 54 years and I just wonder about things like that. I’m not really sure who gave it this name, but I suppose that name is as good as any unless you think the term “mock” means “identical.” The mock crochet stitch is not identical to any crochet stitch mainly because it is knitted; however, it does a pretty fair job mimicking or simulating some types of crochet. This is an asset to folks who like the lacy look of crochet, but have never learned to crochet, or like me, have neurological or other problems that make extended crocheting extremely painful.

When you think about it there are bound to be some similarities between knitting and crocheting since both are defined as “one of several processes of creating fabric from yarn which consists of pulling loops through other loops;” it’s really just a matter of how the loops are manipulated. A sore spot with many yarn crafters is the idea of what you are using (crochet hook, knitting needle, looms & loom hook, etc.) to pull the loops with somehow makes one craft or finished product better than another, just ask a “dyed in the wool” (no pun intended) needle knitter their opinion of loom knitting (see a few comments here). (This scenario is reminiscent of a Dr. Seuss story, The Sneetches.)

However, boundaries occasionally do cross between crocheting and knitting regardless of what the yarn craft purists might think. Do a Google search using the term “converting crochet to knitting” or vice versa, and you’ll find plenty of sites that give suggestions on the best way to accomplish this task. There is even a type of crochet called Tunisian crochet that is sometimes considered a mixture of crochet and knitting, probably because it works with “live” stitches held on a long needle. Also, applying techniques from one craft to another is a good way to "think outside the box." If you ever need a reality check, remember that it’s still just yarn and loops.

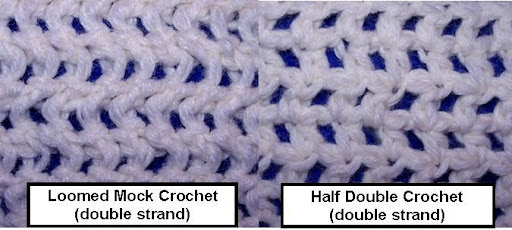
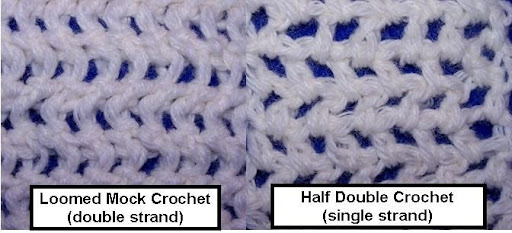
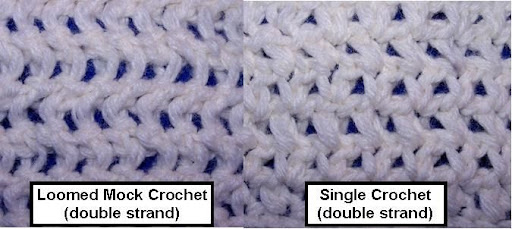
Now to answer the original question, what does the mock crochet mock? The mock crochet scarflet I recently completed was done using two strands of worsted weight yarn on the 24 peg blue Knifty Knitter loom. In an effort to match the gauge, I used double strands of the same yarn from the scarflet, which is used as the sample swatch for the mock crochet, with the exception of one swatch which used a single strand of yarn. The crocheted swatches were completed with either a single, double, or half double stitch and a chain stitch between each one to form a mesh pattern. Out of the five swatches I completed, three simulated the knitted mock crochet stitch the most, but to me the double strand half double crochet stitch appeared to be the closest match. Here are the comparisons below, so you can judge for yourself:

As a final note, I personally think that “mock crochet” is a misnomer. I am of the opinion that a better name for this stitch would have been a knit filet stitch. At least the term “knit filetwould not trigger a diatribe with the crochet elitists.

Note: Be sure and read the comment by Tina (Ladydove) for a brief history of the mock crochet stitch. Also, visit her blog, Pieceful Creations, for instructions on creating the mock crochet stitch.

Saturday, January 06, 2007

U-wrap knit stitch revisited

The U-wrap knit stitch is a technique used when doing the flat knit stitch to keep the stitch from becoming too tight. When I first posted information about the U-turn, or U-wrap, knit stitch, I planned on updating my blog with more detailed information on this stitch. I haven’t done this before now, because when the stitch was discussed on a Yahoo loom knitting list a statement was made that the U-wrap stitch was the “version of how to do the flat knit stitch to keep it loose that Lynn Carpenter (a long-time loomer & list member) had explained in groups many, many times.” Although the stitch was new to me as a relatively new loom knitter, I didn’t want to post information that was common knowledge among the loom knitting community as if was my own discovery. However, others must have missed past discussions of this technique, too, because I’ve had numerous requests for more detailed steps and pictures. In response to the requests, I’ve decided to go ahead post that information here. Although similar information is most likely buried somewhere in a Yahoo loom knitting group messages’ archive, the only reference I could find to the “u-wrap knit stitch” in Google, was on The Purling Sprite’s blog where Isela incorporates a version of this technique in her Crochet Mock Stitch Movie. (Update: Sometime during 2009, the original link to the Crochet Mock Stitch Movie became invalid. However, Isela has since created a video titled: The U-stitch, A Version of Creating a the Flat Stitch.)

Here’s my version the U-Wrap stitch:
  1. Working counterclockwise with loops already on the pegs, place the working yarn in front of the working peg and over the existing loop as if you were making a flat knit stitch.
  2. With the working yarn still above the loop, make a U-turn around and behind the working peg.
  3. Lift the bottom loop from the working peg and knit over the u-wrapped working yarn.
  4. After knitting over, lift the working yarn from behind the peg and bring it to the front between the just knitted peg and the next working peg.
  5. Repeat steps 1-4 for additional u-wrapped knit stitches.
This is one of several ways to produce a regular knit stitch, or stockinette stitch. As you experiment you will notice that the way you hold the yarn controls the tension of the stitch. If the yarn is held flat across the pegs, the stitch will be very tight. If held in an "L" shape (i.e., the yarn is turned on the peg away from you at a right angle) the stitch will still be tight, but a bit looser than the regular flat knit stitch. In the illustrations above, the yarn is held in the "U" position while completing the knit stitch. This will yield an even looser version of the knit stitch and is good for small fast-paced projects when the tightness of the flat knit stitch is not desired. However, the most consistant way to produce a knit stitch is illustrated by Isela in her knit stitch video, which is the opposite of the method used to produce a purl stitch.

Update (added 11-03-08): Isela has recently made a video illustrating the the U-stitch. You can access it by clicking here.