
 As usual, I spend most of this past Saturday in transit to and from our cabin in Centre, Alabama. However, I’ve learned to use the car trip time wisely by loom knitting and since Saturday was the day before Christmas Eve, I had all the more reason to do some last minute gift knitting. I had previously bought some small burgundy with ivory striped cotton towels along with the cutest little primitive heart-shaped buttons and I had dug through my bargain yarn stash for some sand-pebble color yarn, so I had everything I needed for the road trip. By the time I returned home, I had four little towel topper gifts completed, a new way to work an old stitch, and a towel topper pattern that had been refined several times.
Starting the towel topper
First, divide the top of the towel into 12 units, then with two strands of yarn threaded on a darning needle do a running stitch along the marked edge creating 12 double-strand loops. Leave 4 inch yarn tails on either side of the towel to later work and secure into the completed first row of the topper. Using the Knifty Knitter 12-peg flower loom with the right side of the towel facing out, bring the towel up through the middle of the loom and cast the twelve loops along the towel’s edge onto the 12 pegs of the flower loom. With two strands of worsted weight yarn held as one, cast on by e-wrapping above the towel loops, then knit by lifting the towel loops over the e-wrapped loops. This will complete your cast on edge.
Which stitch?
The e-wrapped or twisted knit stitch just seemed too loose for this particular project. The flat knit stitch produces a truer version of the stockinette stitch, but it can sometimes get a little tight after several rows. Also, if you manually loosen stitches, they don’t always have a uniform look. While playing around with the position of the working yarn, I discovered what I call a “u-turn” flat knit stitch. This is accomplished by bringing the working yarn in front of the peg above the existing loop, making a “u-turn” around the peg, then knitting off by lifting the bottom loop over the u-turn loop. This produces an even tension stockinette stitch without the tightness you get from the regular flat knit stitch. This is the stitch I used on most of the towel toppers I made.
 Towel topper body
To create the base of the towel topper body, work 1-4 in rounds (working in a circle) and 5-22 in rows (working back & forth). Rounds 1-4: work a “u-turn” flat knit (UFK) stitch on each peg. Begin decreasing on row 5 by lifting the peg1 loop off and placing it on peg2 and lift peg12 loop off and place it on peg11 (this leaves pegs 1 & 12 empty). UFK pegs 2-11 on both rows 5 and 6. Row 7: work end peg decreases then UFK pegs 3-10 on both rows 7 and 8. Row 9: work end peg decreases then UFK pegs 4-9 on both rows 9 and 10. Row 11: work end peg decreases and UFK pegs 5-8 once.
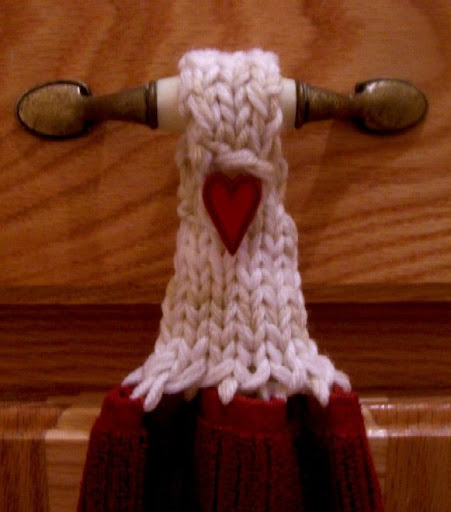
Towel hanger strap
Row 12 begins the towel topper strap used for hanging the towel on the cabinet handle. Since the strap will be flipped to the front of the towel with the wrong side facing out, the strap is completed using purl stitches. Rows 12-22: purl 4 stitches back and forth on each row, which has the appearance of three columns of stockinette stitch from the reverse side. After completing the last row of purl stitches, bind off by going to the opposite end of the working yarn, lifting the next to the last loop off and placing it on the last loop. Knit off, and then move the loop back to the vacated peg. Repeat this procedure two more times ending with one loop. Put a crochet hook through the last loop, chain 4 or 5 stitches, then attach the chain stitch to the opposite side of the bind off edge to form a buttonhole loop. Sew a large shank button at the top of the towel topper body, a couple of rows below where the hanger strap starts. Finish off any loose yarn tails.
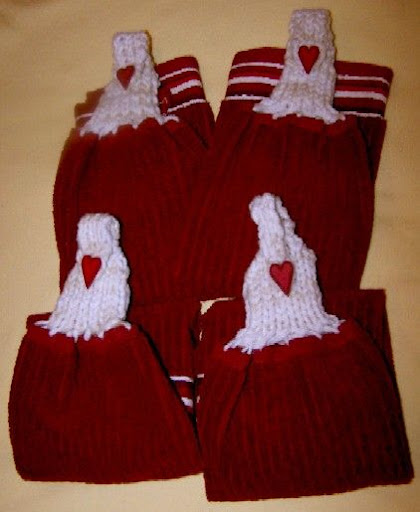
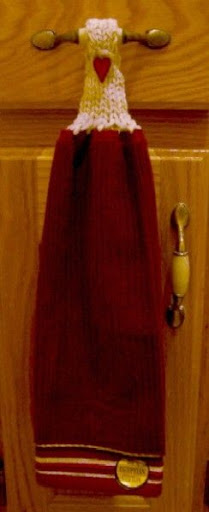
On the right, is the group of completed towels. The one in the lower right was the first one I did and is slightly different from the others. I worked the decreases unevenly and had not quite mastered the hanger strap. Also, I used only one strand of yarn in the running stitch on the towel. I try to think of all these little things as "lessons" instead of "mistakes."


 Wreaths: Here is a picture of three out of five of my little wreaths that survived- I threw away two of them. The two casualties were made using a twisted flat I-cord on one and a braided I-cord on the other and had possibilities, but I just didn’t like the design. The three survivors were made using either a different number of strands or pegs, and varying lengths of I-cord. My favorite of the three is the one on the right, which I will be adding to my pattern box on the right side bar.
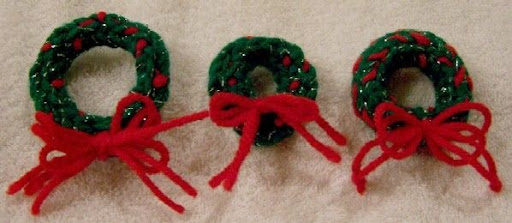 Candy Canes: I’m addicted to making candy canes. The ones pictured are only a sample of what I’ve made and were grouped to show what they look like by changing a few details. All were made on the 5-peg end of the KK spool loom. The first one on the left was made using one strand of red and one strand of white yarn then alternating the colors on each row. A pipe cleaner was added to hold for shaping. The center one was made by doing two rows of white and one row of red; always start with white and end with white. Fabric stiffener was used for shaping. The one on the right was done like the first one, but using two strands of yarn. My favorite is the one in the middle.
 Instructions for the candy canes are available in my Pattern Box on the right.
