Tuesday, February 27, 2007

Loomed leghorn: an egg cozy

It's official, I have spring fever! All I can think about are springtime looming projects. I've got patterns brewing for all types of baskets, bunnies, ducks, chicks and eggs. You could say that I'm "egg-cited" over all the possibilities.

Making an egg cozy
To start things off, I whipped up a little leghorn hen egg cozy that will fit nicely over an egg: both real and plastic. I just happened to have a bag of plastic Easter eggs that I bought on sale a few years ago stashed in my craft supplies, so that's what I used. The hen is loomed on the Knifty Knitter 12 peg flower loom. I did a chain cast on using a medium tension and two strands of worsted weight yarn and then with a flat knit stitch I worked K1/P1 rib stitch for 4 rounds.

The body & head
The body is done in alternating flat knit & purl stitches for 12 rows to form a garter stitch pattern, then I did a flat panel bind off on 6 pegs and continued with the garter stitch pattern for 6 more rows of flat panel work on the remaining 6 pegs to form the head. End by doing a flat panel bind off, remove the hen from the loom and whip the head & back opening shut.

Finishing
The beak, cone and tail trim are made using crochet chains in the corresponding colors and whip stitched in place. Small googly eyes were added for the eyes, but little black buttons or beads would work nicely. If the number of rows for the hen's body is reduced, the cozy could be used with a Cadbury Egg.

Note: A detailed pattern can be found by clicking the link for the Loomed Leghorn Egg Cozy in My Pattern Box on the right sidebar.

Wednesday, February 14, 2007

A couple cupcakes more

Chocolate-coconut cupcake (left) and Strawberry-coconut cupcake (right)

I've loom knitted a couple more cupcakes just to tweak my pattern and experiment with some different things. Out of curiosity, I wanted to see what one would look like when using two strands of yarn. The first one (above left) was completed using two strands of worsted weight (4 ply) yarn in the cup and one strand of brown worsted weight yarn with one strand of white fun fur for the "coconut" topping to simulate chocolate-coconut. It was larger than the first one I made and turned out too chunky to suit me, so I won't be using two strands of worsted weight yarn any more - at least not for the cup part.

The third cupcake (above right) was the results of a trip to Hobby Lobby to buy some supplies for my next project. I saw this yummy candy-colored hot pink yarn on sale and thought it would be perfect for another cupcake. This time the cup was made using one strand of pale yellow worsted weight with one strand of sport weight in yellow twinkle, which is a pale yellow with pink and blue flecks. Also, the cup was make using a regular knit stitch, instead of the knit one purl one ribbing used in the other two cupcakes. The cake topping was made using one strand of medium pink worsted weight with one strand of the hot pink fun fur worked in the same garter stitch pattern as the first two. The third time was the charm for the flat bottom. I discovered quite by accident a way to finish the bottom off very flat and at the same time create a lovely star-burst pattern with a stitch border around the perimeter.

The Loomy-licious Cupcake has been add to my pattern box on the right. If you decide to make a cupcake following this pattern, please send me a link to a picture of your finished cupcake so I can post it here.

Other Loom Knitters' Cupcakes

Sunday, February 11, 2007

A knitted cupcake: loomed & luscious

A topic of discussion on the Decoraccentsinc Yahoo group this week has been a knitted cupcake. One of the members said there was a pattern in the book, One Skein, that she had ordered, but hadn't received. Also, I searched and found a pattern online here. Of course, these were both needle knitted patterns and I never learned to needle knit. So, armed with determination I decided to design a pattern for a loom knitted cupcake.

For this project, I used one strand of worsted weight yarn flat knitted with a tight tension, which produces a gauge of 4 stitches X 8 rows = 1 inch. Three different looms were used: the 24 peg blue Knifty Knitter, the 12 peg Knifty Knitter flower loom and the 5 peg end of the Knifty Knitter spool loom. The visible part of the cup and most of the cake were knitted on the 24-peg blue loom. The cup was done in a flat knit using the K1/P1 rib pattern. The cake is garter stitch with a modified hang hem where the cup joins the cake. Near the top of the cake, I decreased and transferred to the 12 peg flower loom and continued with the garter stitch for several more rows before doing a gathered bind off. To make the bottom of the cup, I hung two of the twenty-four outer loops from the original cast on edge onto each peg of the 12 peg flower loom, then did four flat knit rounds. The yarn was cut and pulled through the 12 loops and left open so the stuffing could be added. Fiber fill was stuffed into the cake. To stuff the cup bottom, I cut the bottom from a clear plastic cup and added scraps of brown yarn and a rock. At this point I finished the gathered bind off to create the flat bottom. The cherry and stem were made on the spool loom and whipped stitched onto the top of the cupcake. The final touch was the addition of pearlized ball head pins to simulate candy sprinkles. So this cupcake actually has a practical function as a pin cushion.

The completed cupcake is 4 1/2 inches tall (including the cherry) and 3 inches wide. Since this was my pilot cupcake, there are a number of adjustments that need to be made before I write the pattern. However, I loved making this, so it shouldn't take too long to cook up another one and write the adjusted pattern.

Tuesday, February 06, 2007

My cheatin' hearts: small gauge knitting on a large gauge loom

When I made the finger puppets (see previous entry), I discovered the most wonderful thing: how to get a small gauge look on a large gauge loom, so I decided to apply this technique to designing some little decorative hearts. These little hearts can be used on hats, scarves, as pins, gifts, etc. Typically, when you make a heart shape, you have to knit the top sections separately. However, not only did I cheat by making a small gauge project on a large gauge loom, I used the "hang hem" technique to shape the top of my little hearts. I wrote the pattern up and put a link to the PDF file in my pattern box on the right, or you can access it here. I hope you enjoy these as much as I enjoyed creating them.

Update: This pattern has been retired and is no longer available. Don't despair, because I replaced it with a newer and better pattern, Little Loom-Knit Hearts.

Thursday, February 01, 2007

This little piggy...a spool knitted finger puppet

A member of the Kniftyknitterlooms Yahoo group recently asked about the possibility of loom knitting finger puppets. This was a topic of one of my earlier posts, Wonderloom meets Boo-Boo Bear. The bear finger puppet mentioned in this post was knitted on the extra small gauge 3/8 inch Wonderloom. At that time, I had not attempted finger puppets on a large gauge loom, because I assumed the large gauge stitch would not be appropriate for the small finger puppet. However, a few days ago I cast fate to the wind and decided to give it a try using the eight peg end of the Knifty Knitter spool loom. For my first attempt I used 2 strands of white 4-ply yarn held as one along with a modified version of the flat knit stitch that I call the "L-knit" stitch. The "L-stitch" actually refers to the way you hold the yarn when doing a flat knit stitch, because after laying the working yarn across the front of the peg, you bring the working yarn on around and behind the peg while holding it at a right angle (L-shaped) position to the peg. When the working yarn is in the "L" position, knit the bottom loop over the working yarn. This creates a nice tight knit stitch that is just a wee tiny bit looser than the flat knit stitch and makes life a little easier when knitting the upcoming rounds. My experiment produced a finger puppet that was 1 1/4" wide and 4" long. I deliberately made it too long so I could determine the correct gauge for my next attempt.
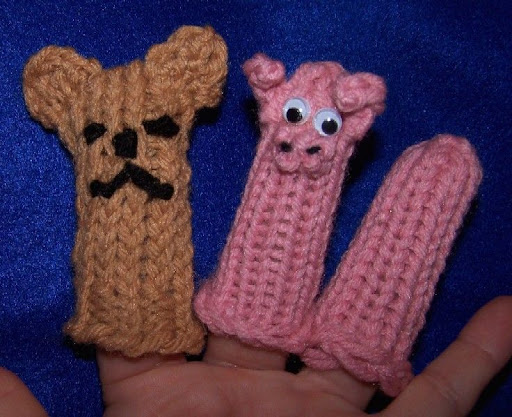
A quick comparison of the bear finger puppet (left) knitted on the 3/8" gauge loom and the finger puppets knitted on the large gauge spool loom. The completed pig (middle) was completed using 1 strand of yarn and the sample on the right was made with 2 strands held as one.

Since I decided on making a pig puppet, the second sample was created with two strands of pink yarn, but after completing it I decided that using two strands made it too bulky for a finger puppet. So on to number three, which was created using one strand of the pink worsted weight yarn. Using a chain cast (see Cast On Instructional--6 different cast ons with step-by-step pictures) on the 8 pegs of the spool loom, I knitted 17 rounds of flat knit stitches, then decreased from eight to four stitches on round 18. The bind off was a gathered removal method (see Getting Started on the Round Loom, p. 14) with the yarn pulled to the inside and tied off. After removing the puppet from the spool loom, I had to stretch it to set the stitches. The third time was a charm, so I proceeded to add the finishing touches. First I knitted two four row I-cords using two pegs on the 5 peg end of the Knifty Knitter spool loom. The snout was made exactly like the ears, except it was only 2 rows. The curly tail is a crocheted chain with the end yarn woven back through the stitches then pulled and tied at the other end to create the curl. The ears, snout and tail were whip stitched in place. The nostrils on the snout were dotted with a black Sharpie marker. To complete the puppet, two little google eyes were glued in place with Aleene's Stretchable Washable Fabric Glue. Voilà, the perfect little pink pig. Now, all I need to do is make him some friends.

For reference, here are some finger puppet sites: