Saturday, January 29, 2011
Lovebugs
Thursday, December 30, 2010
Cold facts

pattern based on Althea Burger's Little Snowmen)
Sunday, October 24, 2010
Specs, the amigurumi owl
I have also added the pattern to my Pattern Box on the right or you can download the pattern here. However, many times we cover topics and questions during class time that aren't always covered in the pattern instructions. So, come on over and join us while we make a parliament of owls!
Thursday, October 14, 2010
Althea's trick-or-treat trio
UPDATE - August 5, 2017: A very sweet lady, Lynn Ray, sent me a photo of her Witchy Poo, Boo-Ella and Jacko, so I thought I would update this older post with a brand new picture.
Wednesday, March 10, 2010
Itsy eggs & bitsy bunnies
The patterns have been test knitted and added to the Pattern Box on the right, or they can be accessed by clicking on Itsy Easter Eggs or Bitsy Bunnies.
Monday, December 21, 2009
Little snowmen and an angel finger puppet
Althea Burger send this cute little snowman picture and instructions to me a month ago, but things got a little busy so it didn't get posted at that time. However, I wanted to make sure I shared this quickie design with my blog readers so you can have this little trio ready to sing Auld Lang Syne by New Year's Day.Little Loomed Snowman
Materials:
- 12 peg KK flower loom
- 5 or 6 peg spool loom.
- White 4 ply yarn,( and small amounts of red & green for hat)
- 7 Giant seed beads (4 black & 1 orange) for eyes,nose & buttons
- Black pipe cleaner or chenille stem for arms
- Yarn needle
- Tiny pompom for hat (red, green or white)
- Low temp glue & gun
- White heavy hand quilting thread and bead needle
- Craft or pillow stuffing
- One 1" Styrofoam ball for head
- 7 clear glass beads, small stones, or Poly Pellets for weight
Head & Body: With the 12 peg flower loom and white yarn, starting at head and working down, do drawstring cast on; knit for 36 rows. Cinch the drawstring cast on edge closed. Insert 1" Styrofoam ball up inside for head. (Note: I used the ball for the head on all my snowmen even if I used stuffing for the rest of their bodies for a neater appearance.) Stuff the rest of the body lightly and add about 7 glass beads or poly pellets for weight before you close the bottom opening. Thread white yarn onto yarn needle and thread it thru neck area and cinch it up to form the neck. Do the same with waist area.
Face & other features: Thread bead needle with white hand quilting thread and sew giant seed beads on head for a face: black for eyes and orange for nose. I didn't do a mouth. Sew black beads on body for buttons down the front.
Arms: Bend a tiny part of black pipe cleaner to hook into yarn needle eye and push needle and pipe cleaner thru middle section & out the other side of snowman for arms. Adjust arms until they look even and bend ends to look like fingers.
Scarf: Green or red yarn on 2 peg spool loom. Make a 30 row I-Cord.Tie off. Wrap & tie around neck area.
Hat: Using green or red yarn on 5 or 6 peg spool loom (I used a self made 6 peg Ioom), work a drawstring cast on and knit for 6 rows. Bind off loosely to make it look like a hat (Note: One suggestion would be to chain a stitch between each bind off stitch). Glue pom pom on top. Sew to top of snowman's head.
OPTIONAL: Add string to create a snowman ornament for your tree.
Angel Finger Puppet
Robin McCoy, from Rockin' The Loom blog and several Yahoo loom knitting lists, recently emailed me about an angel finger puppet she made which was inspired by Althea's Ghost Angel pattern.
Here are her notes in case others would like to make one:- CO with drawstring cast on to the 8 peg end of the spool loom.
- Knit approximately 6 rows; cinch the cast on edge closed; knit 14 more rows for a total of 20 rows.
- BO with crochet bind off, chaining 3 stitches between each bind off stitch (Note: The ruffle look is cute for girl angels, but might just take it off with a loose gathered bind off and let it curl for boy angels).
- Tear a tissue in half or use a small amount of fiberfill and form a ball, stuff this down into the tube, toward the cast on edge. Use a yarn needle and thread to cinch up the neck of the angel.
- To make the wings, follow the same general instructions outlined for Althea's Ghost Angel, but use the 8 peg end of the spool loom and knit for the same 6 rows as the larger angel.
Thanks for sharing, Robin!
Saturday, December 05, 2009
Silly Santa
My friend, Althea Burger, has designed "Silly Santa", a decoration that she wanted to share with Loom Lore readers for a touch of holiday whimsy. Also, keep in mind when March rolls around, "Silly Santa" can become "Loony Leprechaun" for St. Patrick's Day by substituting green yarn for the red yarn and black for the bag transforms into a "pot o' gold". (Please note that this is for decorative purposes and not intended to be used with small children.) Here is her pattern, along with several Santa pics.Silly Santa Claus Pattern
Materials:
- 12 peg Knifty Knitter Flower Loom
- Knifty Knitter Spool Loom
- Small amounts of 4 ply yarn in white, red, black, pink & green
- White tiny buttons for coat
- White and black craft foam or heavy felt
- Bead needle and yarn needle
- Crochet hook size E
- Tiny white pom pom
- Fiber fill stuffing
- 1 " Styrofoam ball
- Giant seed beads in black and red for eyes & nose
- Heavy thread in white
- Something to weight the bottom of Santa and his bag (I used glass stones)
- Low temp glue and gun
- Stick on Velcro (optional)
DirectionsHead: Using the 12-peg Knifty Knitter Flower Loom work a drawstring cast on with pink yarn and knit for 7 rows.
Body: Change to red and knit 9 rows. Change to black to form a belt and knit 4 rows. Change to back to red and knit 15 rows. Put Styrofoam ball up inside for head and stuff body lightly. Add weight to bottom and draw string bind off.
Neck: Thread pink yarn in yarn needle and go thru last row of pink (in and out) to form a gathering string. Pull up tight and tie off.
Waist : Follow the same procedure used for the neck with black yarn at the waist, but do not pull too tight since Santa is on the plump side. Tie off. If you want a "fuller figured" Santa, just omit the gathering string at the waist.
Collar: With crochet hook E and white yarn, slip stitch into last row of pink and chain 3.Half double crochet around neck.Slip stitch to top of ch 3, then fasten off. If you are not comfortable with crocheting, you can work a two peg I-cord long enough to reach around the neck and whip stitch it place.
Hat : With red yarn on either the 5 or 8 peg end of the Knifty Knitter Spool Loom (Note: a self-made 6 peg loom was used in the sample), work a drawstring cast on and knit for 7 rows. Close up beginning cast on. Stretch out bottom of hat and bind off very loosely leaving a long yarn tail (approximately 12 inches). Stitch hat to the top of Santa's head and slip stitch all around bottom of hat to make a brim. Glue or sew white pom pom to top of hat.
Beard: With white yarn and crochet hook size E, slip stitch into one side of face up high just under the hat, where an ear should be. Continue working 9 more slip stitches in an arch down to bottom of face and around face to other side where other ear should be for a total of 10 slip stitches (5 on either side of the face). Turn, skip the first sl st, and sc in second stitch, hdc in third st, dc in the fourth st, tr in fifth st. Continue to the other side of the face working the same stitches in reverse: tr in the sixth st, dc in the seventh st, hdc in the eight st, sc in the ninth st, and slip stitch in the last st. Chain 2, turn and work a sc (or 2 sc) in stitches 2-9 along the edge. Slip st. to the tenth st and fasten off. Once again, if you are not comfortable crocheting the beard, you could work a 2 or 3 peg I-cord for about ten to twelve rows and whip stitch it to Santa's face.
Face : With white thread and beading needle, sew black seed beads for the eyes and red bead for the nose to the face.
Arms & legs: Using either the large pegs on the Spool Loom or the Flower Loom, make two 2 peg I-cords in red yarn for 36 rows or about 10 inches, one will be the arms and the other will be the legs. Both the legs and arms are all one piece and can be pulled (gently) one direction or the other to position them. The length of the arms and legs can vary, depending on how silly or normal you want Santa to appear. Leave short yarn tails at both ends of the I-cords to attach the hands & feet. Pull the arms and legs through the corresponding locations on the body. Cut out hands and feet from craft foam or heavy felt as shown in the pictures below. For both the hands, thread yarn tails at the fold of the foam; and through the front for the feet.
Finish by gluing folded foam pieces together hiding thread ends inside. Optional: Glue tiny pieces of both sides of Velcro on hands (optional).This makes it easy to stick his hands on his hat, toy bag, etc...but it is hard on the yarn if you pull it off and on a lot.
Finishing: Sew buttons to front of body.
Santa's Toy Bag
Using the 12-peg Knifty Knitter Flower Loom and green yarn, work a drawstring cast on. Knit for 21 rows on 12 peg loom.Tie off beginning cast on and leave other end open. Bind off loosely and stretch out open end of bag.Stuff lightly with fiber fill (or chunks of stryofoam) and put weight in bottom of bag (optional). With a short length of green yarn,thread it thru the bag at about the 5th row from the open end . Pull tight and fasten off leaving tails for Santa to hold on to.
Tuesday, November 24, 2009
Tiny Tim Turkey
Althea Burger, who designed the Ghost Angel, has created "Tiny Tim Turkey" just in time for Thanksgiving. She also wanted to share the directions with other loom knitters who read my blog. Thank you, Althea, talking the time to write the instructions and send me pictures of your crafty projects. We will be seeing more of Althea's projects in the future.Talking turkey (pattern instructions)
(PDF version here)
Materials
- Spool loom or 2 pegs on any loom for I-cord
- 24 peg loom (KK blue loom)
- 12 peg loom(KK flower Loom)
- Small amounts single strand 4 ply yarn (gold, dark brown, black, red and variegated fall colors for tail feathers)
- 1" Styrofoam ball for head
- Low temp glue & gun
- Google eyes
- 12" chenille stem (brown or black) for feet
- Fiberfill stuffing
- Size G crochet hook
- Yarn Needle
- With the 12-peg flower loom and gold yarn do the drawstring cast on.
- Knit in the round for 31 rows.
- Draw up and close the cast on edge.
- Work a gathered bind off on the last row; tie off and remove from loom leaving an 8” yarn tail at end.
- Stuff and close up bottom end; thread yarn tail onto yarn needle and stitch up thru middle of body and back down several times. Pull tight to make indentation. Tie off.
- Using variegated fall colored yarn and the 24-peg large gauge loom work a drawstring cast on.
- Knit for 12 rows.
- Cinch the drawstring yarn tail to close the cast on edge and tie off.
- After completing row 12, cut the working yarn leaving a yarn tail long enough to wrap around the loom plus about 4” extra. Bind off by threading a yarn needle with the long yarn tail then sewing up thru the loops and taking them off the pegs. Tie off very loosely.
- After removing from the loom, stretch out other end (see the Ghost Angel wing directions) to make a flat circle shape; fold circle in half to make crescent shape; sew up open edges loosely and sew completed tail to back of body above the center bind off indention. Spread out like a fan.
- Using the spool loom or two pegs of any loom and dark Brown yarn make an I-Cord for 8 rows.
- Bind off and leave yarn tails at both ends.
- Sew one end to center of body where indentation is and other end to top of body where the head will go.
- With the 12 peg loom and dark brown yarn work a drawstring cast on.
- Knit for 6 rows.
- Cinch the drawstring yarn tail from the cast on edge close and tie off.
- Do a gathered bind off after finishing row 6 and leave a yarn tail at end. Remove from the loom, but do not close the bind off edge shut.
- Insert 1" foam ball into the head and draw up the bind off yarn tail tight around the ball and sew whole thing to top of body at top of neck.
One 12" chenille stem. Fold a little bit of the stem so you can hook it to a big yarn needle and thread it thru the bottom of the body (with the needle) for the feet. Bend both the ends of the stem to look like toes (see photo below).
BeakUsing a crochet hook and the gold yarn, chain 3 and double crochet three times in third chain from hook. Slip stitch into top of chain three. Leave yarn tail and sew to front of head. (Note: If you cannot crochet, you can work a 3 row I-cord and shape it to make the beak.)
Waddle
With the crochet hook, chain 4 with red yarn. Sew to side of beak. Glue on eyes to each side of beak.
Wings
Make long loose stitches with YARN NEEDLE in dark brown yarn 6 or 7 times in same spot on either side of body. Spread stitches out to look like wings.
Beard
One short length of black yarn (about 5 1/2 " long) folded in half and sewed to front of neck.With yarn needle,separate the 4 ply stands of the yarn, fluff a little, and trim. Pull the beard into position in the center front of the turkey.
Finishing
Make a “back support stitch” with yarn needle and dark brown yarn several times at the bottom back of body to make ledge to support the body and keep it from tipping over. (Note: I use Poly Pellets, which is available at most craft stores where stuffing is sold, in the base when stuffing toys for added base weight.)

Tuesday, October 27, 2009
Mr. Bee Happy
Jennifer Coldren has created the cutest little bumble bee pattern for the Knifty Knitter 12 peg flower loom. Thank you, Jennifer for sharing your talent!
Now, here's all the info:
"Mr. Bee Happy" Knifty Knitter Flower Loom Pattern"The cutest miniature bee knit entirely on the Knifty Knitter Flower Loom. Easy to do, knit as one piece on the loom.
Thursday, April 09, 2009
Fireman to the rescue
- KK flower loom for the head
- 10" KK loom for the body/feet & hat body
- KK spool loom for the arms & I-cord hat brim
Other finishing details included button eyes, an embroidered mouth and felt trim on the hat and shirt collar. This is so habit forming that I can't wait to start on my next little project.
Tuesday, March 17, 2009
Knifty Leprechaun
Modifications had to be made to the original pattern. The first thing was to use two strands of yarn held as one instead of the single strand that was used on the small gauge loom. Two different Knifty Knitter looms were incorporated for the KK leprechaun above. The 8-peg end of the spool loom was used for the body and the I-cord hat brim. The 12-peg flower loom was used to make the head and the main part of the hat. Also, I used some different stitch techniques to shape the bottom of the body and the top of the hat. This time around I remembered to use black when knitting the hat brim and added a yellow chain stitched buckle. As for the beard and hair, I used two strands of carrot colored Red Heart yarn instead of the copper colored fun fur and loosely crocheted an eight inch chain, which was whip stitched in place. I decided "fun fur" is an oxymoron, because it really isn't much fun to work with. To me, the fun fur is a bit too fussy for the amigurumi style. Another change was the use of buttons for the eyes. Of course, this would not be recommended for use with small children, but I just wanted to see what they would look like on this one.
At the rate I get things done these days, the pattern might be available in time for next St. Patrick's Day. In the meantime, I plan on making other amigurumi characters on the Knifty Knitter Looms since they are quick knits and such a hit with the kiddos.
Thursday, March 12, 2009
Loomy Amigurumi
The little leprechaun pictured above was made during one of our Saturday day trips. Of course, I had to wait until I returned home to embroidery the face and stuff him. (That's the bad part about working on projects on the run, you always leave some of the stuff you need at home.) This little fellow is about four and one-half inches tall. He is made on the small gauge DA Mini-Wonderloom, which is the prefect loom for this type project. I used one strand of worsted weight Red Heart yarn and copper colored fun fur clipped short for the beard. He was worked in three separate parts (body, head & hat), then stitched together. I really liked the way the little hat turned out. I tried a new I-cord technique that worked really well on the hat brim, however, I forgot to change colors and add the hat band - oh well, maybe next time.
Since I used a specialty loom, instead of the Knifty Knitter, I won't be writing the pattern for this one. If you plan on getting into loomy amigurumi, I highly recommend using an adjustable small or fine gauge loom. If you decide to experiment with large gauge looms, I would recommend the Knifty Knitter Long Looms with loom clips and two strands of worsted weight yarn. However, the biggest problem I've found with doing stuffed toys on the Knifty Knitter looms is the stuffing shows through the stitches and this is easily corrected by using the small or fine gauge loom.
Now I'll leave you with an old Irish quote in time for St. Patrick's Day:
Lullabies, dreams, and love ever after.
Poems and songs with pipes and drums
A thousand welcomes when anyone comes.
~Author Unknown
Note: Since this post, I have written a general instruction sheet for making the Loomy Amigurumi Leprechaun. It has been added to the Pattern Box on the right, or by clicking here.
Sunday, October 28, 2007
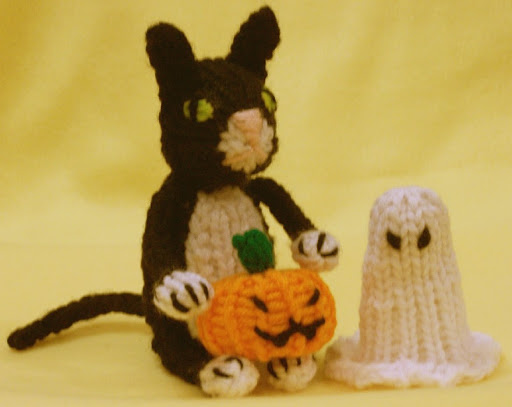
Boo-Ella, Jacko & Tom Tildrum
Just in time for Halloween, I give you Boo-Ella, Jacko and Tom Tildrum. After five months, I finally got to create a few little pieces on the Knifty Knitter Flower Loom. I'm giving a very general description as to how I made each these, since I simply do not have time to type up the detailed pattern.
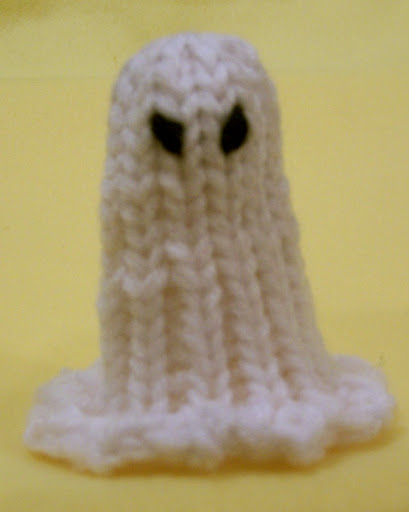
Boo-Ella, the little ruffled ghost, was the first of the trio completed. She stands 3.5 inches tall and was made from the top down. Using two strands of white Red Heart Classic, I did my drawstring cast on (explained in The Easter egg reborn post) and then did a flat knit with varied tension (tighter at the top and looser at the bottom) for 18 rows. The ruffled edge was created usi
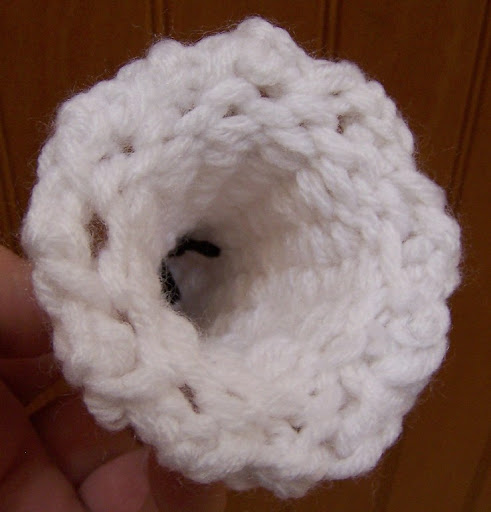
ng a three-stitch I-cord bind off on row 19. The I-cord bind off is a new technique I created just for this project, and it worked so well that I intend on using it on a baby bonnet pattern that I've had in mind. Duplicate stitch eyes were embroidered to create a sinister look.
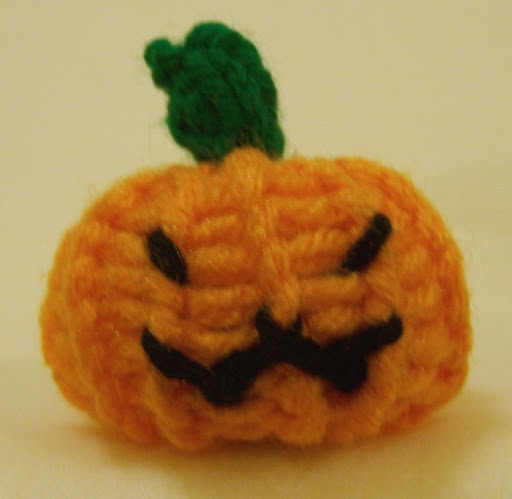
Jacko, my little jack-o-lantern, is a wee little fellow measuring only 2 inches from the top of his stem to his flat little bottom. He was created from the top down using two strands of orange and green Red Heart Classic. Again I used my drawstring cast on and did 12 rows of knit one/purl one ribbing. In order to help shape the item, I cinched the cast on edge that forms the top closed after about five or six rows. I did a gathered bind off after completing the 12 rows, but left the bottom open until the pumpkin was stuffed. After closing the bottom, the yarn was run through to the center top and back to the bottom to get the "pumpkin" shape. The stem was done using one strand of green yarn on the 5-peg end of the Knifty Knitter Spool Loom for five or six row, then attached to the top of the pumpkin. Facial features were embroidered with a single strand of black yarn.
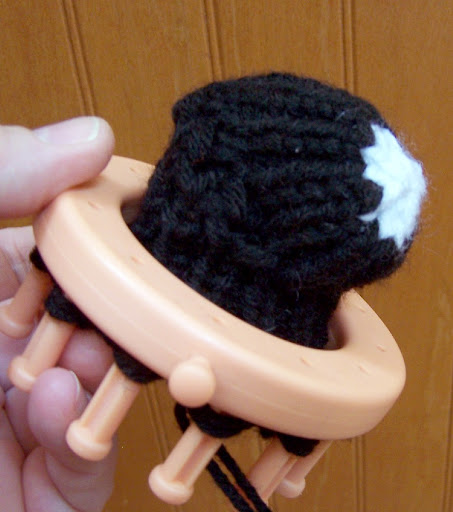
Tom Tildrum, named after a character from the story King o' the Cats, was the more complex of the three. His head and body were made using short row shaping, similar to making a sock. Starting at the nose with two strands of white yarn, I used the drawstring cast on and flat knit one row. Switching to two strands of black, I did four rows before beginning the short rows to shape the back of the head. After the short rows, I did 24 more rows for the body before stuffing and closing with a gathered bind off. The neck was formed by running a strand of yarn at the base of the head and cinching it to define the neck.The white chest/belly was knitted as a separate flat panel piece and attached to the chest/belly area of the cat. It was made using 2 strands of yarn and 5 pegs on the Flower Loom. After doing a drawstring cast on, I completed 15 rows and did a flat panel bind off. The drawstring edge was cinched to taper the top of the panel, which will be centered and attached just beneath the neck area.
Tom's Ears were made using 3 pegs on 5 peg end of the Spool Loom and casting on one stitch on peg 2, then wrapping the yarn around pegs 1, 2 & 3. This will leave two strands on the middle peg and one strand on peg 1 & 3. Knit off the middle peg and continue flat knitting for 6 more rows before doing a flat panel binding off.
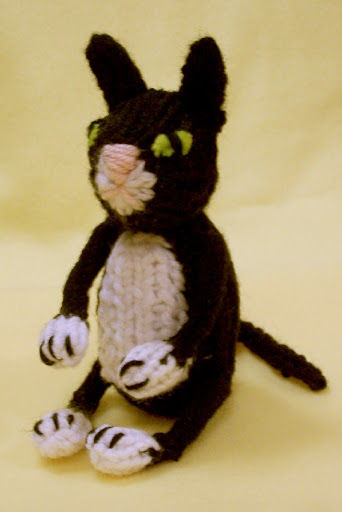
The legs and feet took several attempts before I was happy with them. They were made on the 5 peg end of the Knifty Knitter Spool Loom. Starting with the feet and 2 strands of white yarn, I did my drawstring cast on and knitted for 5 row. The drawstring edge was cinched closed, then changed to 2 strands of black yarn and knitted one more row on the 5 pegs. Next I decreased by knitting off pegs 1 & 2, moving the loop from peg 4 to peg 3 and knitting off, and then moved the loop on peg 3 to peg 2. Next I moved the loop on peg 5 to peg 1, which will leave two sets of loops on both pegs 1 & 2 and no loops on pegs 3, 4 & 5. At this point, the foot was stuffed through the small opening before continuing. The leg was completed by working an I-cord for 12 more rows using pegs 1 & 2 and knitting 1 over 2. The tail was also completed in the same manner as the legs for about 18 rows. The tension must be kept as loose as possible when making the legs and tail or else knitting off the pegs becomes extremely difficult.The cat was finished by attaching the ears, legs and tail. The nose and mouth were embroidered with one strand of pink yarn. The eyes are diamond shaped light green felt, whipped into place using a black embroidering thread with a few stitches added in the middle to form the eye pupil. Three straight long stitches were added to the paws to define the toes.
Wednesday, April 04, 2007
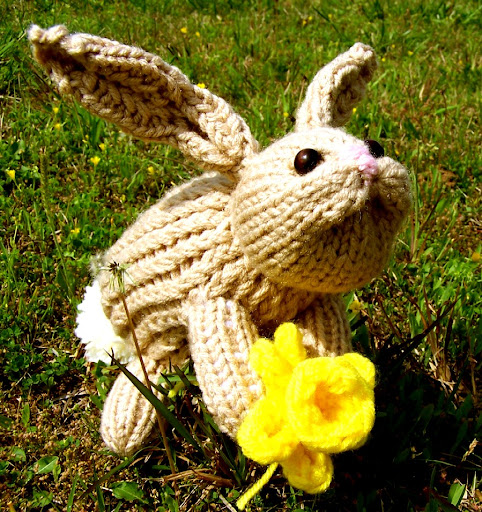
Blossom, the hip-hop flower bunny
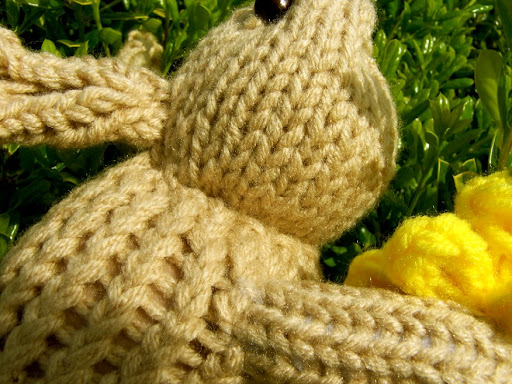
Stand me in the corner, because I'm a bad student. I was suppose to be working on Ann Bipes Easter Bunny for LoomClass this week, but I had already started my own bunny design on the Knifty Knitter blue loom a few days earlier. The blue loom was the loom needed for the LoomClass project so I knew I was in trouble. I only had a few rows of my own project completed on the loom and could have removed it to do the assigned project, but I had several new techniques that I wanted to experiment with and I was afraid if I didn't do it while it was still on my mind that I would completely forget. The results of my bad behavior is Blossom Bunny, a loom knitted bunny with a soft sculpted face.As stated earlier, Blossom was made on the 24-peg blue Knifty Knitter. Starting at the tail end, I used a drawstring cast on (see the Easter egg pattern), worked six rows of flat knit stitch, plus two rows of u-wrap stitch and then closed the bottom area using the drawstring. The largest part of the body was completed with eighteen e-wrap rows.
For the neck area, I decreased using the flat knit stitch by k2tog across the row. When I reached the end of the row, I cut the working yarn leaving a six inch yarn tail. Decreasing this much on a loom is usually a problem, but by working the decreases using a flat knit stitch the tension can be adjusted to accommodate the stationary pegs while knitting and later by using the cut yarn tail as a drawstring.Leaving another six inch yarn tail in the new working yarn, I continued to flat knit the twelve pegs with loops and cast the working yarn on over the empty pegs. On the next two rows, I flat knit all twenty-four pegs to complete the neck area of the head. Continuing with the head, I worked twelve rows of u-wrap stitches, three rows of flat knit stitches in the nose area and ended with open gathered bind off.
The body is stuffed with fiberfill using a knee high stocking as a liner. The neck area is cinched from the inside to the desired size using the yarn tails and then tied off. Pull the stocking liner into the head area and continue stuffing. When the stuffing has been completed, the gathered bind off is cinched shut and tied off.
Other parts include the legs, ears, tail and face. The legs were knitted from feet up using the drawstring cast on and sixteen rows of flat knit stitches on the 8-peg end of the Knifty Knitter spool loom. The ears were worked as a flat panel on the blue loom starting with eight rows of six stitches, then increasing a stitch at the beginning and end of row nine and knitting a total of eight rows with eight stitches. The ear is completed by k2tog at the beginning of each row until only one stitch is left on the peg. The tail is a big white pompom stitched over the initial cast on spot. The face is soft sculpted, which really brings the bunny to life, with a pink embroidered nose and big brown wooden beads for eyes.Now that Blossom has been completed, I'll do the Anne's Easter Bunny so Blossom will have a friend.
UPDATE: Here's the Easter Bunny from Loom Class:
Tuesday, February 27, 2007
Loomed leghorn: an egg cozy
Making an egg cozy

To start things off, I whipped up a little leghorn hen egg cozy that will fit nicely over an egg: both real and plastic. I just happened to have a bag of plastic Easter eggs that I bought on sale a few years ago stashed in my craft supplies, so that's what I used. The hen is loomed on the Knifty Knitter 12 peg flower loom. I did a chain cast on using a medium tension and two strands of worsted weight yarn and then with a flat knit stitch I worked K1/P1 rib stitch for 4 rounds.
The body & head
The body is done in alternating flat knit & purl stitches for 12 rows to form a garter stitch pattern, then I did a flat panel bind off on 6 pegs and continued with the garter stitch pattern for 6 more rows of flat panel work on the remaining 6 pegs to form the head. End by doing a flat panel bind off, remove the hen from the loom and whip the head & back opening shut.
FinishingThe beak, cone and tail trim are made using crochet chains in the corresponding colors and whip stitched in place. Small googly eyes were added for the eyes, but little black buttons or beads would work nicely. If the number of rows for the hen's body is reduced, the cozy could be used with a Cadbury Egg.
Note: A detailed pattern can be found by clicking the link for the Loomed Leghorn Egg Cozy in My Pattern Box on the right sidebar.
Wednesday, February 14, 2007
A couple cupcakes more
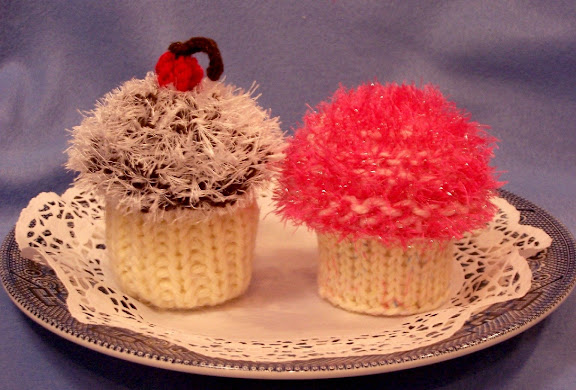
Chocolate-coconut cupcake (left) and Strawberry-coconut cupcake (right) The Loomy-licious Cupcake has been add to my pattern box on the right. If you decide to make a cupcake following this pattern, please send me a link to a picture of your finished cupcake so I can post it here.
Other Loom Knitters' Cupcakes
Sunday, February 11, 2007
A knitted cupcake: loomed & luscious
A topic of discussion on the Decoraccentsinc Yahoo group this week has been a knitted cupcake. One of the members said there was a pattern in the book, One Skein, that she had ordered, but hadn't received. Also, I searched and found a pattern online here. Of course, these were both needle knitted patterns and I never learned to needle knit. So, armed with determination I decided to design a pattern for a loom knitted cupcake.Thursday, February 01, 2007
This little piggy...a spool knitted finger puppet
A member of the Kniftyknitterlooms Yahoo group recently asked about the possibility of loom knitting finger puppets. This was a topic of one of my earlier posts, Wonderloom meets Boo-Boo Bear. The bear finger puppet mentioned in this post was knitted on the extra small gauge 3/8 inch Wonderloom. At that time, I had not attempted finger puppets on a large gauge loom, because I assumed the large gauge stitch would not be appropriate for the small finger puppet. However, a few days ago I cast fate to the wind and decided to give it a try using the eight peg end of the Knifty Knitter spool loom. For my first attempt I used 2 strands of white 4-ply yarn held as one along with a modified version of the flat knit stitch that I call the "L-knit" stitch. The "L-stitch" actually refers to the way you hold the yarn when doing a flat knit stitch, because after laying the working yarn across the front of the peg, you bring the working yarn on around and behind the peg while holding it at a right angle (L-shaped) position to the peg. When the working yarn is in the "L" position, knit the bottom loop over the working yarn. This creates a nice tight knit stitch that is just a wee tiny bit looser than the flat knit stitch and makes life a little easier when knitting the upcoming rounds. My experiment produced a finger puppet that was 1 1/4" wide and 4" long. I deliberately made it too long so I could determine the correct gauge for my next attempt.
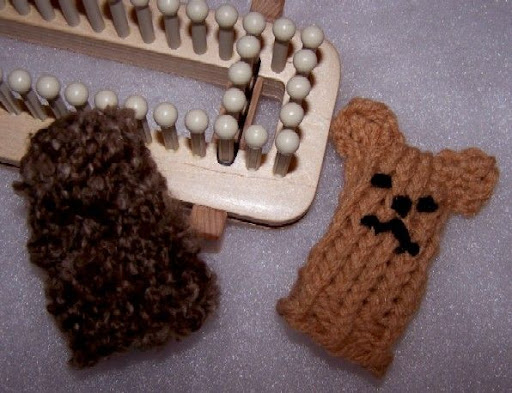
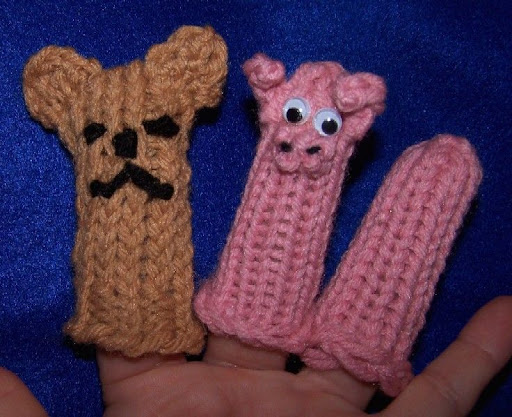
A quick comparison of the bear finger puppet (left) knitted on the 3/8" gauge loom and the finger puppets knitted on the large gauge spool loom. The completed pig (middle) was completed using 1 strand of yarn and the sample on the right was made with 2 strands held as one.
Since I decided on making a pig puppet, the second sample was created with two strands of pink yarn, but after completing it I decided that using two strands made it too bulky for a finger puppet. So on to number three, which was created using one strand of the pink worsted weight yarn. Using a chain cast (see Cast On Instructional--6 different cast ons with step-by-step pictures) on the 8 pegs of the spool loom, I knitted 17 rounds of flat knit stitches, then decreased from eight to four stitches on round 18. The bind off was a gathered removal method (see Getting Started on the Round Loom, p. 14) with the yarn pulled to the inside and tied off. After removing the puppet from the spool loom, I had to stretch it to set the stitches. The third time was a charm, so I proceeded to add the finishing touches. First I knitted two four row I-cords using two pegs on the 5 peg end of the Knifty Knitter spool loom. The snout was made exactly like the ears, except it was only 2 rows. The curly tail is a crocheted chain with the end yarn woven back through the stitches then pulled and tied at the other end to create the curl. The ears, snout and tail were whip stitched in place. The nostrils on the snout were dotted with a black Sharpie marker. To complete the puppet, two little google eyes were glued in place with Aleene's Stretchable Washable Fabric Glue. Voilà, the perfect little pink pig. Now, all I need to do is make him some friends.
For reference, here are some finger puppet sites:
- Finger Puppets
- Finger Puppet Links
- Dear Friends Finger Puppets
- Tubby Finger Puppets
- Pocket Monster Finger Puppet
- Rabbit Finger Puppets
- Finger Puppers
- Frugal House Finger Puppets
- Little Dudes (not finger puppet, but could be)
- Felted Finger Puppets (food for thought)
Wednesday, November 29, 2006
Wonderloom meets Boo-Boo Bear
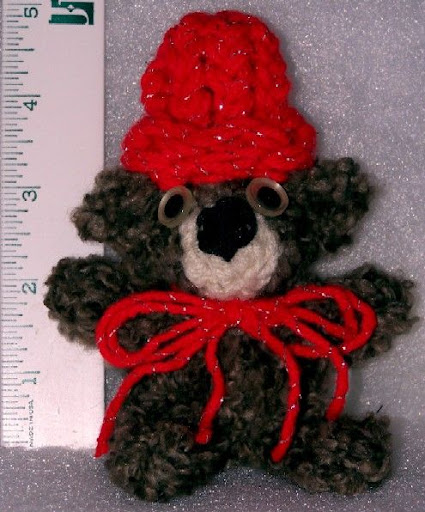
Poor Boo-Boo, the only person’s finger that he would ever stay on would have been a giant with a finger the diameter of two of my fingers and at 5 ft. 10 in. I’m not a small person. So, it was back to the knitting board, where I adjusted the Wonderloom down to 12 pegs (you have got to love the versatility of this loom) and knitted finger puppet number two. This time the finger puppet fit much better and looked more like the picture in the Finger Pupper instructions.My only dilemma now was what to do with poor Boo-Boo: should I toss him in the garbage or do a make-over? Being raised not to waste anything, I opted for the make-over. I took the Knifty Knitter spool loom and created arms & legs; crocheted two ears and a muzzle; cut a knee-high hose to a shorter length, stuffed
it with fiberfill and inserted inside Boo-Boo’s knitted body; finally all this was put together and stitched in place. His nose was embroidered and his white button eyes had black sequins glued to them. A yarn bow and hat which was made on the spool loom were added. Voilà, Boo-Boo Bear went from plain finger puppet to dazzling Christmas tree ornament, instant trash to treasure!