Tuesday, January 30, 2007

Mock crochet…what are you mocking?

A recent response on the rakeknitting Yahoo Group about my lacy scarflet which was loom knitted using a stitch called the “mock crochet” stitch left me wondering which crochet stitch is being mocked. After all, I have crocheted for 54 years and I just wonder about things like that. I’m not really sure who gave it this name, but I suppose that name is as good as any unless you think the term “mock” means “identical.” The mock crochet stitch is not identical to any crochet stitch mainly because it is knitted; however, it does a pretty fair job mimicking or simulating some types of crochet. This is an asset to folks who like the lacy look of crochet, but have never learned to crochet, or like me, have neurological or other problems that make extended crocheting extremely painful.

When you think about it there are bound to be some similarities between knitting and crocheting since both are defined as “one of several processes of creating fabric from yarn which consists of pulling loops through other loops;” it’s really just a matter of how the loops are manipulated. A sore spot with many yarn crafters is the idea of what you are using (crochet hook, knitting needle, looms & loom hook, etc.) to pull the loops with somehow makes one craft or finished product better than another, just ask a “dyed in the wool” (no pun intended) needle knitter their opinion of loom knitting (see a few comments here). (This scenario is reminiscent of a Dr. Seuss story, The Sneetches.)

However, boundaries occasionally do cross between crocheting and knitting regardless of what the yarn craft purists might think. Do a Google search using the term “converting crochet to knitting” or vice versa, and you’ll find plenty of sites that give suggestions on the best way to accomplish this task. There is even a type of crochet called Tunisian crochet that is sometimes considered a mixture of crochet and knitting, probably because it works with “live” stitches held on a long needle. Also, applying techniques from one craft to another is a good way to "think outside the box." If you ever need a reality check, remember that it’s still just yarn and loops.

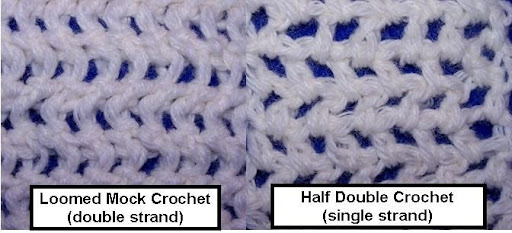
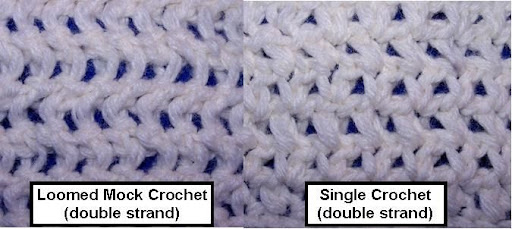
Now to answer the original question, what does the mock crochet mock? The mock crochet scarflet I recently completed was done using two strands of worsted weight yarn on the 24 peg blue Knifty Knitter loom. In an effort to match the gauge, I used double strands of the same yarn from the scarflet, which is used as the sample swatch for the mock crochet, with the exception of one swatch which used a single strand of yarn. The crocheted swatches were completed with either a single, double, or half double stitch and a chain stitch between each one to form a mesh pattern. Out of the five swatches I completed, three simulated the knitted mock crochet stitch the most, but to me the double strand half double crochet stitch appeared to be the closest match. Here are the comparisons below, so you can judge for yourself:

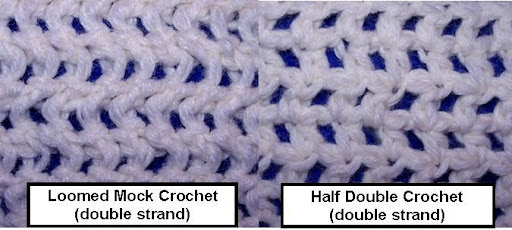
As a final note, I personally think that “mock crochet” is a misnomer. I am of the opinion that a better name for this stitch would have been a knit filet stitch. At least the term “knit filetwould not trigger a diatribe with the crochet elitists.

Note: Be sure and read the comment by Tina (Ladydove) for a brief history of the mock crochet stitch. Also, visit her blog, Pieceful Creations, for instructions on creating the mock crochet stitch.

Saturday, January 27, 2007

Lacy scarflet, a touch of love on the looms

With Valentine’s Day on the horizon, I wanted to make a few holiday related items. The first one I decided to do was a little lacy scarflet. The picture above of the completed design evolved from four previous attempts that looked good on paper, but not so good on the loom. Originally, I wanted to do a heart shaped design using the eyelet stitch, but after doing about ten or twelve rows of failed attempts I finally went with the mock crochet stitch. The scarflet measures about 24 inches long and 6 inches wide and was worked as a flat panel using 16 pegs of the 24 peg blue Knifty Knitter, and two strands of worsted weight yarn held as one. Using a chain cast on, the beginning two rows and the last two row were worked in the garter stitch pattern to provide an even edge for the lacy scarflet body. In order to keep the scarflet attached without a pin, I loom knitted three “bobble” buttons and attached them so the scarf could be fastened along the outer edge. When worn, I turn the top edge back to form a collar. Although a pin is not necessary, I have been experimenting in order to decide which (if any) pins I should wear with this little scarf. Also, it’s amazingly warm considering the openness of the lacey stitch.

Update: This pattern has been published in the Spring Issue of Loom Knitter's Circle Magazine. It is also available as Lacy Scarflet in My Pattern Box on the right side bar of this blog.

On a non-loom knitting note, I attended a crazy quilt handbag class all day today. The class was conducted by a wonderful lady called Barbara Randle of B.Randle Designs from Birmingham, Alabama. Ms. Randle is the author of two books on crazy quilting, travels extensively to collect unique fabrics, and conducts workshops all over the world teaching her craft. This was the most fun I’ve had without a loom in my hands in a long time. I walked out at the end of the day with my completed designer bag that I made (see picture below).

Friday, January 19, 2007

Sock-It-To-Me Dog Sweater

I'm slowly recovering from having a new puppy in the house and having grandchildren for a two week visit, so I finally set down and knitted a new doggie sweater for Shandy, my elderly Maltese, in order to apply the corrections to my original sock sweater pattern. This time I've added the detailed pattern to my Pattern Box on the right.
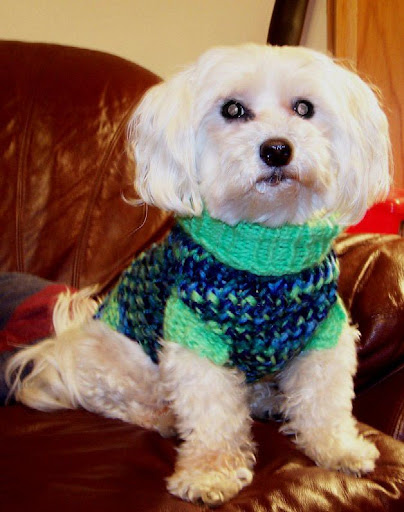
I love the colors of the yarn in this one and the contrasting ribbing added to the back edge and leg openings is a nice touch. Also, the back is a straight flat panel instead of the tapered "saddle" look of the first one. It's actually easier to do and it keeps my baby warmer.
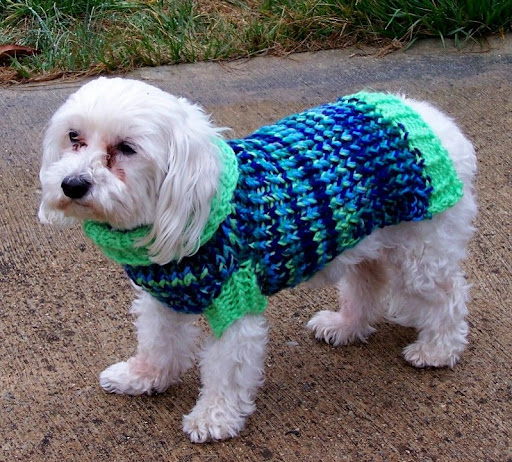
Speaking of babies, I need to knit one for Toula, my newest baby Chihuahua, and Shandy's tormentor. Hopefully, I’ll have some new projects up in a few days, if Toula doesn't chew up the yarn.

Saturday, January 06, 2007

U-wrap knit stitch revisited

The U-wrap knit stitch is a technique used when doing the flat knit stitch to keep the stitch from becoming too tight. When I first posted information about the U-turn, or U-wrap, knit stitch, I planned on updating my blog with more detailed information on this stitch. I haven’t done this before now, because when the stitch was discussed on a Yahoo loom knitting list a statement was made that the U-wrap stitch was the “version of how to do the flat knit stitch to keep it loose that Lynn Carpenter (a long-time loomer & list member) had explained in groups many, many times.” Although the stitch was new to me as a relatively new loom knitter, I didn’t want to post information that was common knowledge among the loom knitting community as if was my own discovery. However, others must have missed past discussions of this technique, too, because I’ve had numerous requests for more detailed steps and pictures. In response to the requests, I’ve decided to go ahead post that information here. Although similar information is most likely buried somewhere in a Yahoo loom knitting group messages’ archive, the only reference I could find to the “u-wrap knit stitch” in Google, was on The Purling Sprite’s blog where Isela incorporates a version of this technique in her Crochet Mock Stitch Movie. (Update: Sometime during 2009, the original link to the Crochet Mock Stitch Movie became invalid. However, Isela has since created a video titled: The U-stitch, A Version of Creating a the Flat Stitch.)

Here’s my version the U-Wrap stitch:
  1. Working counterclockwise with loops already on the pegs, place the working yarn in front of the working peg and over the existing loop as if you were making a flat knit stitch.
  2. With the working yarn still above the loop, make a U-turn around and behind the working peg.
  3. Lift the bottom loop from the working peg and knit over the u-wrapped working yarn.
  4. After knitting over, lift the working yarn from behind the peg and bring it to the front between the just knitted peg and the next working peg.
  5. Repeat steps 1-4 for additional u-wrapped knit stitches.
This is one of several ways to produce a regular knit stitch, or stockinette stitch. As you experiment you will notice that the way you hold the yarn controls the tension of the stitch. If the yarn is held flat across the pegs, the stitch will be very tight. If held in an "L" shape (i.e., the yarn is turned on the peg away from you at a right angle) the stitch will still be tight, but a bit looser than the regular flat knit stitch. In the illustrations above, the yarn is held in the "U" position while completing the knit stitch. This will yield an even looser version of the knit stitch and is good for small fast-paced projects when the tightness of the flat knit stitch is not desired. However, the most consistant way to produce a knit stitch is illustrated by Isela in her knit stitch video, which is the opposite of the method used to produce a purl stitch.

Update (added 11-03-08): Isela has recently made a video illustrating the the U-stitch. You can access it by clicking here.

Thursday, January 04, 2007

Shandy’s doggie “sock” sweater

I finally made Shandy, my aging Maltese, a sweater. The decision on how to make this sweater was arrived at in a rather odd matter, but “odd” is typical for me. After looking at a number of knitted sweater patterns and trying to decide which direction to go in to loom knit a doggie sweater, I was doing laundry yesterday when I picked up a stray sock, looked at the shape, and the “doggie sweater light” came on in my head. When I was a child I would dress dogs and cats in “clothes” since I had no one else to play with (poor baby). One of the outfits my kittens or puppies wore was an altered sock sweater. Just imagine the toe end cut off the sock, small circular holes added on either side of the heel area and the ribbed top of the sock becoming a “turtleneck” on the doggies new sock sweater. The bend in the heel part of the sock fits the animal’s body perfectly.

For Shandy’s sweater, I used two different looms: the blue Knifty Knitter loom for the black ribbed turtleneck and the first 4 rows of the variegated brown/black/tan sweater neckline. The yarn was transferred at this point from the KK 24-peg blue loom to the KK 31-peg red loom where I had to increase 7 stitches spaced evenly throughout the row. I’ve worked out a method for transferring projects between looms using Susan Bates Split-Lock Stitch Markers so this is not as difficult as it once was. (These same stitch holders have also proved invaluable when frogging.) Anyhow, the remainder of the doggie sweater was made like a very large sock without a toe. The heel section which is the doggie sweater chest section was formed using short rows worked on 16 pegs, decreasing down to 8 pegs, increasing back to 16 pegs and resume knitting on all 31 pegs. The openings created by the short rows became the front leg openings. When the body of the sweater (which is the foot portion of the sock pattern) reached the length of the bottom of Shandy’s ribcage, I bound off 8 stitches on the underside of the sweater, knitted 2 rows and began decreases on every other row until 16 pegs were left with loops. These 16 peg rows were knitted back and forth until the back length was about 2 inches from the tail, and then I decreased end pegs on every other row until 8 pegs were left. I purl stitched for two more rows and did a bind off.

Since this is the proto-type sweater there are some things that need to be tweaked, but all-in-all I am happy with the results. I originally planned on doing about 1.5 inches of black ribbing for the leg openings, but decided to save that for the next sweater. Also, I will probably decrease the turtleneck to a ribbed neck edge opening and do the entire sweater on the red loom next time around. Curling doesn’t seem to be a problem with this sweater, but just to keep the edges neat I plan on doing two purl stitches at the end of each row on the flat panel back area. When I get the pattern worked out, I’ll add it to my pattern box on the right for those who might be interested in the “Doggie Sock Sweater” pattern. I designed this pattern for Shandy, who has a chest measurement of approximately 14 inches, but it can easily be adapted for a larger (or smaller) dog by using the same sock method on either a larger or smaller loom. A good rule-of-thumb when using Knifty Knitter’s is to select the large gauge loom with at least twice as many pegs as the number of inches you need for the dog’s chest measurement. For example, the light blue Knifty Knitter 62-peg long loom would produce a doggie sweater that would fit a dog with an approximate chest size of 30 inches, but you would probably need to use a smaller loom for the neckline on a dog this large.

Update note on 4/17/07: I've discovered that I'm not the only one who uses socks for dog sweaters. I just recently discovered someone who has made a whole outfit for their Yorkie from an Argyle sock. Check it out: Yorkie Outfit Project.