Monday, December 17, 2007

Bright bells

After making the Victorian Lace ornaments, I had some of the metallic colored Needloft Craft Cord left over. To me, the colors of the metallic cord are reminicent of the 40's vintage Shiny Brite ornaments. So with this in mind, I designed a little bell that is not only super quick to make, but has two different styles of rims. Last year I wrote a pattern for Knifty Christmas Bells, but this bell is even quicker, easier and more fun to make than the Knifty Bell.

Very similar in design to the little Halloween ghost, Boo-Ella, the Shiny Bright Bell is made from the top down using the drawstring cast on, nine rows of flat knit stitch, one row of e-wrap stitch, and your choice of two styles of rims.

The first style rim, the fastest of the two, is the garter stitch rim which is made by alternating the last three rows with purl & flat knit stitches, then finished with a basic flat panel bind off. You can also add a little variety by using a contrasting color cord to create a stripe. The gold bell pictured on the left has a red cord added on rows 6-8 for the stripe.

The second style rim uses the I-cord bind off to create a little flare. You can vary the number of stitches in the I-cord to suit your taste. The white bell pictured on the right was made using Needloft white/silver and a 3 stitch I-cord edge. This style is not only good for holiday ornaments, but when done in white it makes a very nice wedding decoration.

The free pattern is located here and in the Pattern Box on the right sidebar.

Friday, December 07, 2007

Poinsettia on the knitting loom

The poinsettia, or flower of the Holy night, is based on a Mexican legend which you can read about here. While technically not a flower, its beauty rivals that of any flower I know. If you are a regular reader of my blog, you know of my love for creating flowers on the knitting looms and since it is the holiday season I just had to experiment with creating a poinsettia. I've not formally written the pattern, because I really don't know how much interest there is making these. Instead, I will give a description of how I made my poinsettia in this blog post.

The red leaf of the poinsettia began with a drawstring cast on (see Easter Egg pattern for drawstring cast on directions) on the little pink Knifty Knitter long loom using the first 12 pegs as a round loom.

Drawstring cast on: beginning and completed

After casting on, I knitted (flat knit stitch) for nine rows. The gap between the two rows of pegs creates a loose tension that constantly needs to be adjusted. When about seven rows have been completed, cinch the cast on edge shut.

Closing the cast on edge

Before beginning the tenth row, decrease the stitches at each corner by lifting the outer corner loop and placing it on the neighboring peg. You now have eight pegs with loops (four pegs on each side of the loom). The bottom loop on the four corner pegs is knitted over the decreased loop to give the illusion of a little spike edge on the leaf.


Decreasing at the corners and knitting the decreased peg

After the first decrease, knit five more rows and decrease as before. This will leave four pegs with stitches. Knit four more rounds on the four remaining pegs then do a gathered bind off. Be sure and adjust the tension on the loops prior to binding off. Cut the working yarn leaving an eight inch tail. Use a crochet hook to work the yarn tail around one side of the leaf all the way to the base. Tie a square knot using the yarn tail and the cast on tail, then trim the tails. The completed leaf should look similar to this:


Completed red leaf

When six red leaves have been completed, use a yarn needle, pinch the leaves at the bottom and join all six leaves at the base like this:


Completed leaves shaped and joined

The cyathium, or yellow center, is formed using one strand of yellow yarn and fifteen yellow beads. Thread the fifteen beads on the strand of yarn prior to knitting. Using the five peg end of the pink Knifty Knitter spool loom, do a drawstring cast on. Knit two rounds adding a bead to each stitch. Do a flat panel bind off, adding a bead to each bind off stitch. Cinch the cast on edge shut then whip stitch the cyathium where the red leaves are joined at the center of the flower.

Make six green leaves by increasing the rows from the red leaf instructions as follows:

  • Knit ten rows on twelve pegs; then decrease to six pegs
  • Knit eight rows on the six pegs; then decrease to four pegs
  • Knit six rows on the four pegs; then bind off.
The green leaves are joined by overlapping the edges instead of pinch pleating as you did with the red leaves. The joined green leaves should look similar to this:


Joined green leaves

Complete the poinsettia by placing the red leaves on top of the green leaves so the green leaves show between each pair of red leaves and whip stitch in place. The finished poinsettia is approximately eight inches in diameter.

Thursday, November 29, 2007

Victorian lace ornament, a touch of elegance

Although I could never afford to buy one, Faberge ornaments are the most beautiful of all holiday items. With that in mind, I decided to create a "little touch" of Faberge style on the Knifty Knitter Flower Loom. The result is what I call a Victorian Lace Ornament, similar in design to this Faberge Coronation Ornament that sells for about one hundred bucks.

Since my design is made with metallic cord from the craft department at Wal-Mart and shatterproof (translates as plastic) ornament balls, these will only set you back about fifty cents each plus your time. As with most of my projects, these make up very fast. Also, the lace ornaments would make a nice little extra gift for someone special and best of all, no one has to know how cheap you really are. The pattern is available here or in my Pattern Box on the right.

This project was also featured in Craftzine here.

Wednesday, November 07, 2007

Loom knit snowflakes, a lesson in I-cord bind off

When I posted Boo-Ella I promised to follow up on the new technique I developed for the ruffled edge of her skirt which I call the I-cord bind off. It is really very easy to do and creates a nice picot edge that could be used on baby items or any place you want a little added decoration.

Since I've had a number of folks email me asking for the snowflake pattern, I decided to design a snowflake that incorporates the I-cord bind off on the outer edge. I knitted Snowflakes on the Loom last year, but this snowflake design is very different from those. They were made using short row shaping and the new one is made completely in the round on the 12 peg Knifty Knitter flower loom. I never posted the instructions for those snowflakes, because they were actually a translation of a needle knitted design from a book, Knitted Snowflakes. The new snowflake is not only my original design, it is much quicker and easier to make; plus you have a mini-lesson, free pattern and a finished project all rolled into one. The pattern is located here and is posted under Pattern Box in the right sidebar. Hopefully, you will enjoy making and displaying these as much as I did designing them for you.

Sunday, October 28, 2007

Boo-Ella, Jacko & Tom Tildrum

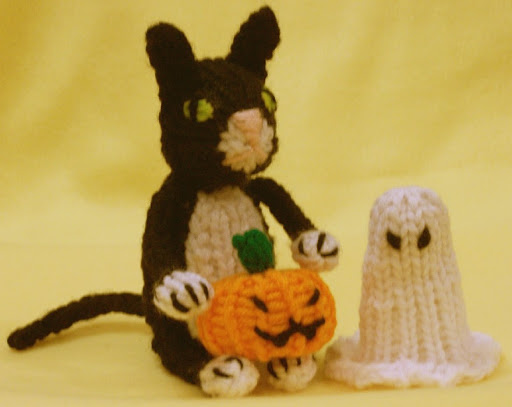
Just in time for Halloween, I give you Boo-Ella, Jacko and Tom Tildrum. After five months, I finally got to create a few little pieces on the 
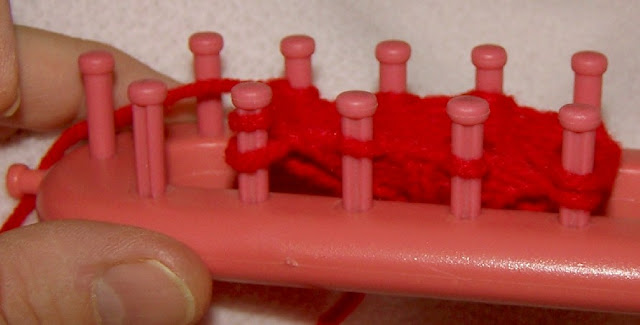
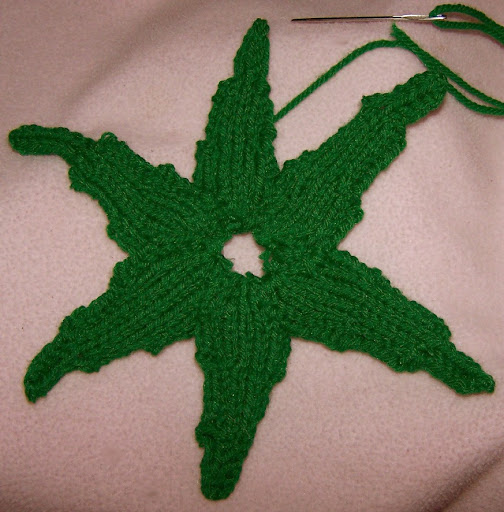
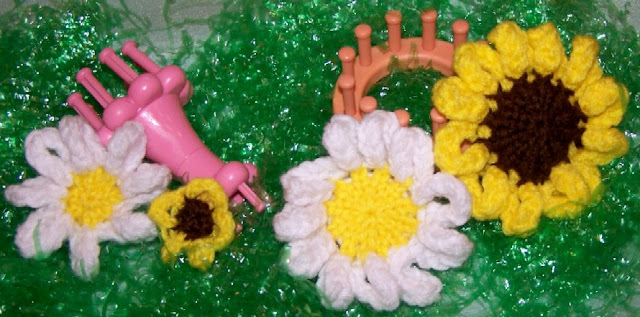
Knifty Knitter Flower Loom. I'm giving a very general description as to how I made each these, since I simply do not have time to type up the detailed pattern.

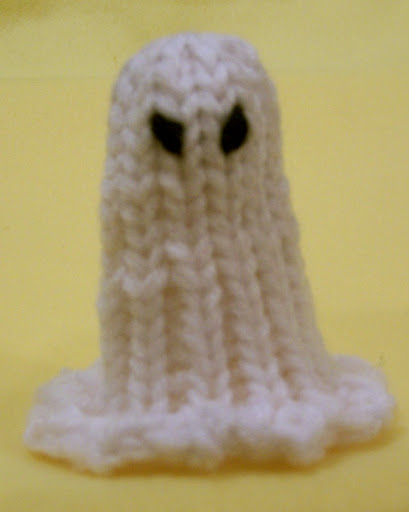
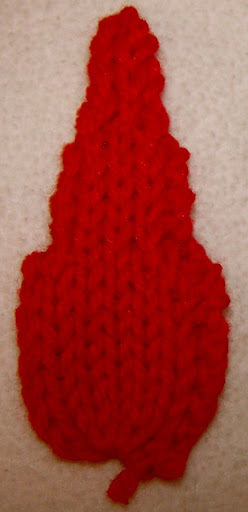
Boo-Ella, the little ruffled ghost, was the first of the trio completed. She stands 3.5 inches tall and was made from the top down. Using two strands of white Red Heart Classic, I did my drawstring cast on (explained in 
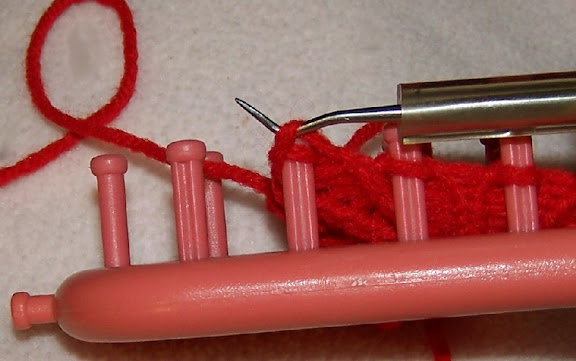
The Easter egg reborn post) and then did a flat knit with varied tension (tighter at the top and looser at the bottom) for 18 rows. The ruffled edge was created using a three-stitch I-cord bind off on row 19. The I-cord bind off is a new technique I created just for this project, and it worked so well that I intend on using it on a baby bonnet pattern that I've had in mind. Duplicate stitch eyes were embroidered to create a sinister look.

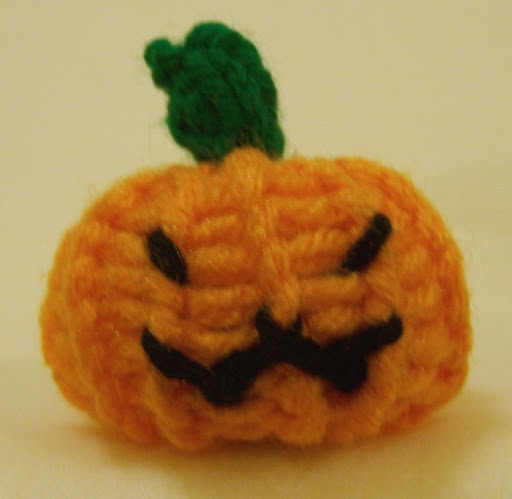
Jacko, my little jack-o-lantern, is a wee little fellow measuring only 2 inches from the top of his stem to his flat little bottom. He was created from the top down using two strands of orange and green Red Heart Classic. Again I used my drawstring cast on and did 12 rows of knit one/purl one ribbing. In order to help shape the item, I cinched the cast on edge that forms the top closed after about five or six rows. I did a gathered bind off after completing the 12 rows, but left the bottom open until the pumpkin was stuffed. After closing the bottom, the yarn was run through to the center top and back to the bottom to get the "pumpkin" shape. The stem was done using one strand of green yarn on the 5-peg end of the Knifty Knitter Spool Loom for five or six row, then attached to the top of the pumpkin. Facial features were embroidered with a single strand of black yarn.

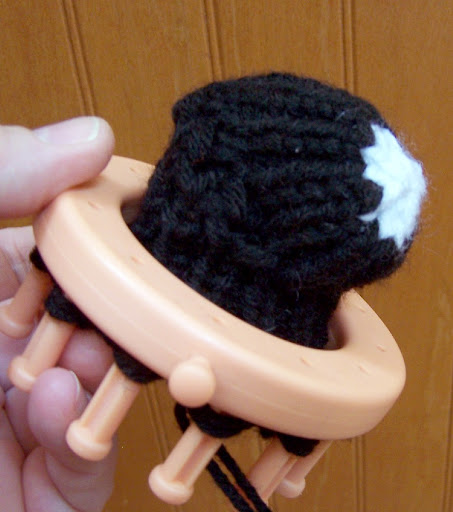
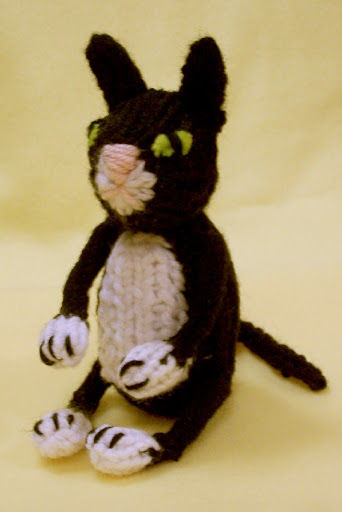
Tom Tildrum, named after a character from the story King o' the Cats, was the more complex of the three. His head and body were made using short row shaping, similar to making a sock. Starting at the nose with two strands of white yarn, I used the drawstring cast on and flat knit one row. Switching to two strands of black, I did four rows before beginning the short rows to shape the back of the head. After the short rows, I did 24 more rows for the body before stuffing and closing with a gathered bind off. The neck was formed by running a strand of yarn at the base of the head and cinching it to define the neck.

The white chest/belly was knitted as a separate flat panel piece and attached to the chest/belly area of the cat. It was made using 2 strands of yarn and 5 pegs on the Flower Loom. After doing a drawstring cast on, I completed 15 rows and did a flat panel bind off. The drawstring edge was cinched to taper the top of the panel, which will be centered and attached just beneath the neck area.

Tom's Ears were made using 3 pegs on 5 peg end of the Spool Loom and casting on one stitch on peg 2, then wrapping the yarn around pegs 1, 2 & 3. This will leave two strands on the middle peg and one strand on peg 1 & 3. Knit off the middle peg and continue flat knitting for 6 more rows before doing a flat panel binding off.

The legs and feet took several attempts before I was happy with them. They were made on the 5 peg end of the Knifty Knitter Spool Loom. Starting with the feet and 2 strands of white yarn, I did my drawstring cast on and knitted for 5 row. The drawstring edge was cinched closed, then changed to 2 strands of black yarn and knitted one more row on the 5 pegs. Next I decreased by knitting off pegs 1 & 2, moving the loop from peg 4 to peg 3 and knitting off, and then moved the loop on peg 3 to peg 2. Next I moved the loop on peg 5 to peg 1, which will leave two sets of loops on both pegs 1 & 2 and no loops on pegs 3, 4 & 5. At this point, the foot was stuffed through the small opening before continuing. The leg was completed by working an I-cord for 12 more rows using pegs 1 & 2 and knitting 1 over 2. The tail was also completed in the same manner as the legs for about 18 rows. The tension must be kept as loose as possible when making the legs and tail or else knitting off the pegs becomes extremely difficult.

The cat was finished by attaching the ears, legs and tail. The nose and mouth were embroidered with one strand of pink yarn. The eyes are diamond shaped light green felt, whipped into place using a black embroidering thread with a few stitches added in the middle to form the eye pupil. Three straight long stitches were added to the paws to define the toes.
There were a several more fall projects I wanted to do, but I'll just have to put those on the back burner for now for a later day. Right now that back burner is pretty full.

Monday, October 08, 2007

Candy corn, pumpkin, spider web & turkey hats

Among some of my first loom knitted projects were the autumn hats for my grandchildren that I made last October. I posted information about these on several of the Yahoo groups, but at that time I didn't have a blog. I've decided to go ahead and add them to my blog since they are autumn projects.

The first of my autumn hats was the little pumpkin hats I made for my twin grandchildren who were born last September. They were just a few weeks old when the picture on the right was made. The Pumpkin Hat pattern is listed in my Pattern Box on the right.

My second autumn hat was the Candy Corn Hat I made for my granddaughter. She was only nine months old when the picture was made. This hat was made using Red Heart worsted weight yarn with 2 strands held as one. The yellow brim was made rather long in order to turn up on the outside using k2/p2 ribbing. Two or three rows of yellow and the remainder of the hat were made using the basic e-wrap knit stitch (double strand wraps knitted over double strand wraps). The yellow & orange part of the hat, along with 2 rows of the white, was made on the red KK loom. I decreased one peg every 3 or 4 pegs on the 31 peg red KK after doing about 18 or 19 rows of the orange to end up with loops on 24 pegs. These were transferred to the 24 peg blue KK and a couple more rows were knitted off. After that I decreased every other peg on the 24 peg blue loom to end up with 12 pegs with loops, which were transferred to the little peach colored 12 peg KK flower loom. A couple more rows were knitted off and then I decreased every other peg again to end up with six pegs. I ended by knitting off the 6 pegs using the existing loops on the pegs since they each had 2 wraps on them and used the gathered removal method to bind off. A white pompom was added to the top.

The third of the autumn hats was the spider web hat I made for my grandson, who was 2 years old when the picture was made. This hat was done on the green loom. The cuff is a k1/p1 ribbing with 3 rows of black, 3 rows of orange and 3 more rows of black. The body of the hat was done in orange using a regular e-wrap knit stitch for 18 rows. After that I used the same technique outlined in the Tommy Turkey Hat pattern, where you divide the hat into 4 sections, and decrease into a point. When you finish the 4 wedges, whip stitch them together. The web pattern was accomplished by marking off where I wanted the web to go, then holding a strand of black yarn on the inside of the hat and chain stitch it in place using a crochet hook through the knit stitches.

The last of the autumn hats was my Tommy Turkey Hat. This was one of those spur of the moment things that was just fun to do. The instructions for this pattern are also located in the Pattern Box on the right.

Knitting with Knifty Knitter III - booklet review

Knitting with Knifty Knitter III (pictured on the right) is ProvoCraft's most recent full color booklet in it's little "Slim Jim" series. Most all of the patterns in this publication are written for the Knifty Knitter Long Looms. The Spool Loom and Flower Loom are used for various embellishments. Here is an outline of the booklet's contents:
  • Page 1, the cover, features four pictures of five different projects included in the booklet: Off-to-School Afghan, Felted Pack, Carnival Throw, and two Basic Scarves.
  • Pages 2-5 focuses on stitches and techniques. Along with the basics (e-wrap & various wrapping methods) instructions for creating ribbed knit and honeycomb knit using the long looms as knitting boards are included. Also covered are: increasing, decreasing, crochet bind off, basic crochet stitches and the mattress stitch.
  • Pages 6-15 contain the eleven projects.
  • Page 16, the back cover, has pictures of the Knifty Knitter looms and tools.
The Projects
Here is a rundown of the eleven projects included in the little booklet, along with the looms required for each one:
  • Basic Beanie is the standard basic Knifty Knitter (KK) hat made on the KK yellow long loom.
  • Basic Scarves includes two projects. The first one is the Honeycomb Scarf knitted on the KK pink long loom used as a knitting board. The second scarf is a Red Tube Scarf with pompoms on each end made on the KK flower loom.
  • Felted Pack, a backpack made on the blue long loom for the bag and the spool loom for the I-cord straps, includes powered punch dying and felting. The pack is pictured (see the cover picture above) with white rings of some sort attached to the bag which are used as a decoration or to hang items like sunglasses; however, there is no mention of these rings in the pattern instructions.
  • Felted Bag is a little navy bag with red & white stripes made on the KK yellow long loom for the bag with I-cord straps made on the spool loom. The project is pretty basic, but I liked the creative technique with the I-cords used to fashion a simple fastener for the bag.
  • Felted Flowers are simple little I-cord flowers made on the spool loom to be used as embellishments on other items.
  • Off to School Afghan is a colorful 60" X 60" afghan knitted in four separate squares on the KK blue long loom and stitched together. It is edged in four rows of double crochet to match the four main squares.
  • Off to School Pillow, a 13" X 13" throw pillow, compliments the Off to School Afghan. Instead of squares, four equilateral triangles, which are made on the KK blue long loom using increases and stitched together to form a square. Two of these squares are used to make the pillow.
  • Carnival Throw, a 50" X 80" afghan, is knitted in six long ribbed panels on the KK pink long loom and stitched together. What really makes this throw unique is that each panel has tapered ends, which are created using increases and decreases. The throw is pictured with tassels on the tapered ends (barely visible in the cover picture above), but no mention of making or adding the tassels is made in the project instructions.
  • Plastic Bag Holder & Scrubber completes the projects in this little booklet. The 9" X 20" Plastic Bag Holder is created on the KK green long loom with an I-cord handle from the spool loom added. The little Scrubbers, made from netting on the flower loom, are made to slip on two fingers when cleaning pots and pans.
The projects in this little booklet are very basic and edited to bare bones instructions, even occasionally omitting some steps. Still, it is pretty fair and well worth the ninety-seven cents I paid for it.

Thursday, September 27, 2007

Lots of loomy resources

Typically, my blog posts relate to projects I'm working on or projects I've finished. Unfortunately, that hasn't happened in several months due to changes that have taken place in my home. Two of my grandchildren (ages 3 years and 20 months - both in diapers) have been living with my husband and I since June, so knitting has not been a major priority in this household. When they were first placed with me, I was reminded as to why younger folks by nature are the ones meant to raise the young ones. The first few weeks almost did me in, but there is a quote by Freidrich Nietzsche that goes: "That which does not kill us makes us stronger." Things are gradually getting better each day and as the cooler weather approaches, I feel the call of the looms.

Even though I've not been able to work directly on projects, my idea book has expanded greatly. I do have a project on the loom and a Lion Suede moccasin slipper that needs it's mate, but for now I'll focus on areas in the right sidebar of my blog which were updated but may have gone unnoticed. The first area added is called Online Resources, which includes links to articles and online tools to assist in your knitting endeavors. The other area is a link list to Loom Knitting Books & DVD's. If you have an item that you feel should be included in either list, please let me know by posting a comment.

One other item I wanted to include is a list of links I have accumulated for making looms. So many people live in areas where looms are not always available to them or for one reason or the other ordering a loom is not an option. In this case, the best solution is to make a loom. I posted this list on the KniftyKnitterLooms Yahoo Group, but wanted to include it here so folks that were not members of that group could access it. As I find new sources, I will update this list. Here's the list in alphabetical order (updated September, 2021):
Hopefully, you will find the links I've added to this blog helpful. Since we are settling into a routine around here, perhaps my next blog post won't be four months coming. Thank you for sticking with me in my absence.

Thursday, May 24, 2007

Wendy's Snood

The topic for today is the snood. Now, for those of you who don't know what a snood is, it is a type of headgear straight out of the Middle Ages wore by fashionable ladies of the day. Women of the World War II era, the 70's, and SCA members during recent years have reclaimed a love affair with the snood. Believe it or not, there has even been a movie about the snood called, The Taming of the Snood, but it didn't get very good reviews (imagine that). If you are interested in more historical snood facts, check here.

For all you loom knitters that have longed for a snood pattern, the wait is over. Wendy Stevens, a very talented lady from the Yahoo loom knitting groups, has designed one for the Yellow Knifty Knitter Round Loom and is graciously sharing it with everyone. Since she doesn't have a blog, she sent me the pattern and pictures so I could post it on my blog to make it available for other loom knitters. Without further adieu, I give you Wendy's Snood. I have also listed it in the Pattern Box on the right sidebar.

Friday, May 18, 2007

Felted roses

Loom knit felted roses
(The red rose on the right was done using two strands of yarn and didn't felt as well as the other three done with a single strand. of yarn)


After a week of babysitting the twins (my son's children), I finally finished the fourth rose (pictured on the loom in the previous post), worked out the pattern for the leaves, knitted eight leaves for the four roses (two for each rose), and felted all of them last night. I just had to snap one more picture of all four roses before felting so I could compare them with the felted roses. Also, I wanted to remember how they looked in case something went horribly wrong during the felting process.
Pre-felted roses

Finally, with reckless abandon I cast the four flowers into hot depths of the washing machine and waited for what seemed like an eternity while the metamorphosis took place. Upon retrieving them from their metal cocoon, I was totally awestruck at the transformation. This was my first voluntary experience with felting, but it definitely won't be my last. I have already started another rose-colored rose and as soon as I locate some yellow wool yarn, I'll make some yellow roses. These can be used for hat decorations, corsages, added to hair clasps, on handbags, gift bags, or room decorations.

The Felted Roses flower pattern has been added to My Pattern Box in the right sidebar. I have also been asked to teach this project for the LoomClass Yahoo Group.

Saturday, May 12, 2007

A rose like no other

Due to illness, it's been over a month since my last post. Most of April was spent battling some sort of upper respiratory infection that was the direct results of trimming dead and molded blooms from the shrubs surrounding my deck. Just when I was recovering, I brought took two of my grandchildren home with me for an extended visit only to discover they both had some sort of nasty viral infection which I promptly caught. This only lasted about four days, but most of that time was spent in bed and left me weak from the high fever and dehydration. My granddaughter continued to stay with me, since it took her even longer to recover.

The next project I had wanted to do prior to my month long illness, was a loom knitted rose. Occasionally, I would pick up the loom and try out an idea, but things just didn't seem to click. After a number of failed attempts (approximately six to be exact), I was curled up in the recliner and just happened to notice an experimental piece that I had made laying in the scrap heap. The little brown circular piece was made using short row shaping when I was trying to figure out a way to make a flat bottom for the Loomy-licious Cupcake, but was discarded mainly because I didn't like the way it curled around the outer edges. I noticed that when I twisted the little "C-shaped" disc into a cone that the curled edges closely resembled the "petals" of Nicky Epstein's needle knitted roses. Now all I had to do was the math (number of strands, stitches & increases) to polish the ugly little brown disc into a full blooming rose.

So far I've only used Patons Merino Wool Yarn since I want to felt the finished roses. The first short row rose was done with two strands of the red yarn using eleven pegs on the 24-peg round blue Knifty Knitter. The resulting rose (first on the left pictured above) seemed too bulky to suit me. The next two roses were done with a single strand of yarn using nine pegs on the 10 inch pink long Knifty Knitter long loom. Of these two roses, the white one (pictured in the middle above) has 14 wedges or sections formed by the short rows and the red one (pictured on the right above) has 18 wedges. These were closer to what I had in mind. The fourth rose, still on the loom (pictured below), is made similar to the second and third rose, but the sequence in the short row shaping was varied to create a fuller rose with a smaller base. When completed, it will have ten or twelve sections, but the sections will be wider on the outer edge. If you look closely at the picture, you can see the wedge shaped sections.
The next step will be to felt the roses. This shouldn't be too difficult since I'm experienced - I've felted several of mine and my husband's sweaters over the past years by accident when they went from an XL to a child's size 6. (I currently have one of his sweaters hid in the laundry room that is slated to become a handbag in it's next incarnation.) I will continue this post in a couple of days when the current rose is off the loom and all of the roses have been felted. At that time I will have a detailed pattern. Until then, "Happy Mother's Day" - these roses are my gift to you.

Wednesday, April 04, 2007

Blossom, the hip-hop flower bunny

Stand me in the corner, because I'm a bad student. I was suppose to be working on Ann Bipes Easter Bunny for LoomClass this week, but I had already started my own bunny design on the Knifty Knitter blue loom a few days earlier. The blue loom was the loom needed for the LoomClass project so I knew I was in trouble. I only had a few rows of my own project completed on the loom and could have removed it to do the assigned project, but I had several new techniques that I wanted to experiment with and I was afraid if I didn't do it while it was still on my mind that I would completely forget. The results of my bad behavior is Blossom Bunny, a loom knitted bunny with a soft sculpted face.

As stated earlier, Blossom was made on the 24-peg blue Knifty Knitter. Starting at the tail end, I used a drawstring cast on (see the Easter egg pattern), worked six rows of flat knit stitch, plus two rows of u-wrap stitch and then closed the bottom area using the drawstring. The largest part of the body was completed with eighteen e-wrap rows. For the neck area, I decreased using the flat knit stitch by k2tog across the row. When I reached the end of the row, I cut the working yarn leaving a six inch yarn tail. Decreasing this much on a loom is usually a problem, but by working the decreases using a flat knit stitch the tension can be adjusted to accommodate the stationary pegs while knitting and later by using the cut yarn tail as a drawstring.

Leaving another six inch yarn tail in the new working yarn, I continued to flat knit the twelve pegs with loops and cast the working yarn on over the empty pegs. On the next two rows, I flat knit all twenty-four pegs to complete the neck area of the head. Continuing with the head, I worked twelve rows of u-wrap stitches, three rows of flat knit stitches in the nose area and ended with open gathered bind off.

The body is stuffed with fiberfill using a knee high stocking as a liner. The neck area is cinched from the inside to the desired size using the yarn tails and then tied off. Pull the stocking liner into the head area and continue stuffing. When the stuffing has been completed, the gathered bind off is cinched shut and tied off.

Other parts include the legs, ears, tail and face. The legs were knitted from feet up using the drawstring cast on and sixteen rows of flat knit stitches on the 8-peg end of the Knifty Knitter spool loom. The ears were worked as a flat panel on the blue loom starting with eight rows of six stitches, then increasing a stitch at the beginning and end of row nine and knitting a total of eight rows with eight stitches. The ear is completed by k2tog at the beginning of each row until only one stitch is left on the peg. The tail is a big white pompom stitched over the initial cast on spot. The face is soft sculpted, which really brings the bunny to life, with a pink embroidered nose and big brown wooden beads for eyes.

Now that Blossom has been completed, I'll do the Anne's Easter Bunny so Blossom will have a friend.

UPDATE: Here's the Easter Bunny from Loom Class:

Friday, March 30, 2007

Looms in bloom: daffodils

We returned from Argentina this past Saturday from a wonderful vacation to what has been a disastrous week at home. The terrible events of this past week are too numerous and unbelievable to list and even though I couldn't find the time to knit, I knitted in my mind while riding or driving from one place to another or laying in the bed as my prequel to sleep. Bright yellow daffodils, the fruit one of my mental knitting exercises, finally materialized in yarn form late last night. These little beauties were made on the eight peg end of the Knifty Knitter spool loom. The basic steps to making this flower, which is made from the top down, are as follows:
  • Using two strands of yarn as one, do a chain cast on using all eight pegs of the spool loom. The cast on edge forms the lacy lip of the "cup" on the daffodil.
  • Flat knit for eight rows.
  • For the petal, work an eight stitch I-cord between six of the pegs. (Instructions for the I-cord stitch technique are outlined in the jellybean basket pattern). Due to the narrow opening in the center of the spool loom, I had to pull the I-cord "petals" to the outside between the pegs as I completed each petal. The best loom for this project would be a regular gauge six peg spool loom with a standard opening in the center. I've not seen one with these specifications available anywhere, but Noreen Crone-Findlay's spoolies come close. Eventually, I may get brave and just make one, but for now the little pink KK spool loom was the loom of choice from what I had laying around.
  • Do a hang hem by lifting the ladders between the pegs from row eight of the flat knit row onto corresponding pegs. This step was difficult, because there is so much bulk in the small opening of the KK spool loom that it is hard to determine which strands of yarn you need to be lifting. Therefore, if you guess incorrectly, you will need to touch up your mistakes with the yarn needle at the end of the project.
  • Flat knit for one more row.
  • Do a gathered bind off. Cinch the yarn tail tightly and tie off leaving a 12-inch tail.
  • Thread one strand of the yarn tail on a yarn needle for doing touch ups.
  • Finishing touches include running a gathering strand at the base of the"cup" and tightening it to make it smaller at the bottom. Also, depending on how good your guess was on lifting the ladders when you did the hang hem, you may need to cinch the vertical space between the petals.
These are actually fairly easy to make. The biggest aggravation was the compromises that had to be made for the inadequacy of the loom. Now all I need to do is buy some emerald green yarn to make stems and leaves.

Sunday, March 11, 2007

Looms in bloom: loom knitting flowers

My desire to knit a flower has been germinating every since I first picked up the Knifty Knitter flower loom and last night the idea came into full bloom. When I went to bed and couldn't sleep, I tried counting sheep, but it only made me think of yarn. The next thing I knew I was playing with my flower loom. I had been toying with the idea of using the drawstring cast on to create the center of a flower after using it with the Easter egg pattern. Then when I used the I-cord stitch for the scalloped rim on the jellybean basket, I decided it looked a lot like flower petals, so I set to work to test my theory. The large sunflower above was the results of my runaway imagination. After completing the sunflower, I went to sleep dreaming of other possibilities and more flowers.

Today ended up being "car trip" day, which means time to loom knit. I tested various looms and changed the number of rows each time. The picture below shows the flowers I made during the car trip pictured with it's corresponding loom, along with the "bedtime" sunflower. The daisy & black-eyed Susan were made with the spool loom: the daisy on the eight peg end and the black-eyed Susan on the five peg end. The large daisy and the sunflower were made on the twelve peg flower loom.

I do not recommend the spool loom for your first flower. It's very cumbersome to work with, especially on the five peg end where the inside loom opening is very narrow. The twelve peg flower loom produced the best flowers, but they are also quite large having a four & one-half inch diameter.

How to grow sunflowers on the flower loom
Unfortunately, I'm pressed for time right now and will not be able to write a detailed pattern until I return from vacation at the end of the month. However, you will find the flowers quite easy to make if you are familiar with my drawstring cast on method (see the Easter egg pattern) and the scalloped I-cord stitch trim I used in the little jellybean basket. Do a drawstring cast on using the twelve peg flower loom and two strands of Red Heart worsted weight yarn in brown or your chosen color. Flat knit Rows 1-4 and on Row 5 do e-wrap knit stitches. Cinch the center opening shut by pulling on the initial yarn tail from the drawstring cast on. Pull the yarn tail to the inside and tie off. Change yarn colors to two strands of bright yellow. Row 6 consists of a nine stitch I-cord pattern. On Row 7, lift the ladders from Row 5 to do a hang-hem, then knit the bottom loops over the hang-hem loops. Row 8 is an e-wrap knit stitch row and Row 9 is the flat panel bind off row. End by tying off, securing and trimming all yarn tails.

Experiment on your own using various yarns and modified stitches. Be sure and share pictures of your accomplishments so we can all learn from them. The possibilities are endless.

Friday, March 09, 2007

A tisket, a tasket, a jellybean basket

OK, I'm in panic mode. I have so many ideas and so little time to do them. We are getting ready to go on vacation to Argentina and Uruguay for ten day and since I've been playing with the looms I've let my laundry go to.....well, it's pretty bad. Anyhow, this will probably be my last blog post until I return. Of course, I'm taking a few looms and some yarn - you didn't think I could actually go that long without them, now did you?

Of all the little loomies I've make, I believe this one is my favorite. The little Jellybean Basket is made on the Knifty Knitter flower loom and the handles are done on the five-peg end of the Knifty Knitter spool loom. The completed basket is about 4.75 inches tall. Of course, the basket design wouldn't be possible if I hadn't made it's perquisite designs. The cupcake contributed the flat bottom and the Easter egg improved on the flat bottom by using the drawstring cast on method.

Also, my treetop angel, Anabelle, started me using the I-cord for a scalloped edge. The scallops are much more polished in this basket design, because it is integrated directly into one of the rows as a stitch pattern. I considered integrating the I-cord handle directly onto the basket, but decided not to push my luck this time.

I also tried different stitch patterns to create a type of basket stitch (see the two pilot baskets pictured to the right), but I decided to stay with a flat knit stitch in the end. Even though the stitch patterns didn't suit me, The flat bottoms looked pretty good. (see left).

The basket looked good without it, but to help keep its shape when adding goodies, I cut the bottom from an eight ounce plastic drinking cup and inserted it into the basket bottom. I used Easter grass, small jellybeans and a Peeps marshmallow bunny to decorate.

The pattern is listed in the right sidebar under My Pattern Box, or by clicking here. By using a larger loom and increasing the number of rows, this little basket could easily be made into a larger design. If I were making it larger, I would probably make 3 sets of I-cord for the handle and braid them for reinforcement. You would also need to find a small plastic bowl to insert into the bottom to help maintain the shape. However, I like the little basket just the way it is, because to me it's the small things in life that matter most.