Showing posts with label decorations. Show all posts

Friday, November 05, 2010

Indian Corn


Someone on Yahoo's Knifty Knitter Group recently asked if you could make Indian corn on the knitting looms similar to Alicia Kachmar's crocheted design that she describes in her blog post, "It's never too late for Indian corn."  I had actually saved the link to Kachmar's Indian corn post over a year ago and had tried to work out a stitch pattern that would look acceptable on the knitting loom. At that time, things just didn't click and I moved on to the next project at hand. When the subject came up again, I decided to give this project another shot.  

First, deciding on the stitch pattern was the key to making the corn look like corn. After searching several needle knitting sites, I settled on the wrong side of what's known as the "linen stitch." The next thing was to translate the stitch pattern to the looms and decide on which loom to use. Since this stitch required an odd number of pegs and I planned on working it in the round, the five-peg end of the Knifty Knitter Spool Loom became the loom of choice. After working out the translation, everything sort of fell into place. Here is an expanded explanation of the linen stitch for the 5-peg loom:

Linen Stitch
Rnd 1: Flat Knit peg-1, pass the yarn in front of peg-2 without knitting; flat knit peg-3, pass the yarn in front of peg-4 without knitting; flat knit peg-5.
Rnd 2: Pass the yarn in front of peg-1 without knitting which will leave two sets of yarn strands on this peg, flat knit peg-2; pass the yarn in front of peg-3, flat knit peg-4; end row by passing the yarn in front of the peg-5.
Repeat rounds 1 & 2 until you reach the desired length.
**Note: On pegs with 3 loops, knit 2 bottom loops over top loop.

Kachmar recommended using Lion Brand Homespun yarn for her crocheted corn. I tried the Homespun on several ears of knitted corn, but quickly discovered that I preferred Red Heart Classic or Red Heart Super Saver using one strand of solid with one strand of variegated yarn in autumn colors. Also, don't be tempted by the self-striping yarn, because it doesn't change colors quick enough to work properly with the little three to four inch ears of corn. You'll soon discover that trying different yarn color combinations is fun and addictive with this project. You really can't tell how the colors are going to work until the corn ear has been knitted and turned so the wrong side becomes the right side.

The Indian Corn pattern is available as a PDF file here, or in the Pattern Box on the right. It will also be offered as a class project on Yahoo's Loom Class during this upcoming week (November 7-13, 2010). Kudos to Alicia Kachmar for the inspiration for this project!

Sunday, November 30, 2008

Short row snowflake

Snowflakes were one of the things I really enjoyed making when I crocheted. However, I have neurological problems with my hands (mostly the left one) that has severely limited my ability to crochet. That is the primary reason that I started loom knitting about two years ago. Sadly, one of the first things I noticed is there is not a lot of knitted snowflake patterns available, so I thought I might as well create a few for the looms.

My first experiments with knitted snowflakes are outlined in a previous blog post, Snowflakes on the loom. Last year, I designed another snowflake pattern discussed in Loom knit snowflakes, a lesson in I-cord bind off. This year I decided (for now at least) to keep it simple with a little Short Row Snowflake.

The current snowflake is very basic, but it has many possibilities. The design can take on a whole new look just by relocating the points on the short rows, or by working a YO (yarn over) into the design to create a lacey look. The pattern is listed in my Pattern Box or by clicking here. If you decide to experiment with this basic pattern, be sure and let me see what you come up with.

Monday, November 10, 2008

It's time to make the ornaments!

Belle Angel
In case you haven't noticed, I love knitting small items and what fits into this category better than holiday ornaments? They are sort of like the microcosm of the knitting world. You can experiment with new techniques without the fear of making huge mistakes. It's much less stressful to frog something that took only a couple of hours to knit as compared to an item that took weeks to knit. Another advantage to making these miniature wonders is that you can really spread the love by giving more of your friends something you made yourself. Who says happiness doesn't come in small packages?

This fall I've been showing others how to spread the love by teaching ornament classes on the Yahoo LoomClass Group and the Beginning-LoomKnitting Group. The classes taught for LoomClass include three ornaments in each class. Bell Ornaments Class, which was taught a couple of week ago, featured Knifty Christmas Bells, Bright Bells, and a new pattern called Belle Angel. I made the first Belle Angel two years ago and wrote about it in this December 2006 post, but had never written the pattern until recently. The new Belle Angel (pictured above) is a little more sophisticated that her predecessor, but the original Belle holds a special place in my heart.

I-cord Ornaments, the second LoomClass ornament class, is currently in session. Ornaments for this class include Candy Canes, Mini-Christmas Wreaths and another new pattern called Bright Star. The little star is designed specifically for the 5-peg end of the Knifty Knitter Spool Loom.
Bright Star Ornament
The Lace Ornaments class, coming up on 11/30-12/06, is the last of the ornament classes for LoomClass. The ornaments taught in this class will be the Victorian Lace Ornament, Lacey Snowflake and a Basic Shortrow Snowflake. The first two patterns are already available, but the Basic Snowflake pattern will be posted the day before the class begins. In the meantime, I'll include a picture in this post.

Basic Shortrow Snowflake

The class I am teaching for the Beginning-LoomKnitting Group (11/24-28) is a Snowflake Angel. I'm very proud of the way this particular angel is designed. Her wings and skirt are all one piece with her arms woven into a row of mock crochet stitches in the wings. The pattern is located here and in the Pattern Box to the right. Here's a picture of my Snowflake Angel:

Snowflake Angel

One thing that both angels have in common is what I call a "picot cast on" at the beginning edge of the skirt. This is an a technique I've created for the looms that allows you to make a picot edge. I use a similar technique when binding off the wings on the Snowflake Angel. I will talk more about the picot technique in upcoming blog posts.

Sunday, December 17, 2006

Annabelle, my treetop angel

As promised, Belle, my little ornament angel, now has a very big sister. Annabelle, a 10 inch tall treetop angel, took a couple of days to complete, mostly because I was creating, frogging and re-creating her as I went. I've always loved the crocheted angels and decided I wanted to loom knit something similar. Never mind that there was no pattern to be found for a knitted angel for neither the looms nor needles, or at least not one like I wanted so I decided to create one. My angel is made of the following separate components and then joined together: halo/head/body piece, arms, 2 joined wings, a skirt and skirt ruffle. Three different Knifty Knitter looms were used: 5 & 8 peg spool loom, 12 peg flower loom & 24 peg blue round loom. This is a brief summary of what I did:
The halo/head/body piece was done on the KK 8 peg spool loom. A combination of twisted knit, purl and flat knit stitches were used to shape and give the illusion of a face, hair and halo. The neck was formed by stuffing a cotton ball in the head and tying a strand of yarn around the neck area. The arms are I-cord made on 4 pegs of the KK spool loom and pulled from the inside through stitches in the “shoulder” area of the body. The skirt, done on three different looms, was the most complex of all the pieces. The bottom ruffle was done first by making a very long piece of I-cord prepared on the KK spool loom using 3 pegs, then attaching it to the blue KK loom by pulling the stitches onto the pegs as a cast on edge. Two types of lace stitches were used in the main part of the skirt then switching to flat knit and decreasing to 12 pegs, the skirt was transferred to the 12 peg flower loom. Once on the 12 peg loom, the waist of the skirt was finished by using a combination of twisted knit, flat knit and decrease stitches. Finally, the wings were completed in decreasing rows of lace stitches and attached at the corners to make a unified set. The various pieces were then joined. Fabric stiffener was added while the piece was blocked on a large plastic soft drink cup and then left to dry over night.
This was a challenging project, but I absolutely love doing things like this. I’m currently working on loom knitted snowflakes, which are also a bit of a challenge, but they are coming along nicely. I’ll post the results as soon as I’m finished.

This picture shows the size difference between the two angels. Annabelle (right) has a wing span of 7 inches and is 10 inches tall. Belle (left) is only 2½ inches tall.

Friday, December 08, 2006

"Each time a bell rings, an angel gets his wings"

The title of this blog entry is from the all time classic Christmas movie, It's a Wonderful Life. In the case of my loom knitted angel, a bell became an angel. One of the challenges of loom knitting is creating multi-dimensional shapes on what is basically fixed pegs. Belle, my little angel ornament, is the result of an experiment in overcoming the shaping restrictions on looms. Her skirt, which is based on my Knifty Christmas Bells pattern, is very full and flared at the bottom, but tapers gradually to the waist without bulky gathers. With the exception of her halo & wings, this little 3 inch Christmas tree ornament is made entirely on the pink Knifty Knitter spool loom using white worsted weight yarn. She is made in three pieces: the bell-shaped skirt, and two 4½ inch lengths of I-cord which form the head/body and arms. The skirt is knitted on the 6-peg end of the spool loom using two strands held as one. The I-cord is knitted on the 5-peg end of the spool loom using one strand of the same yarn. All 5 pegs were used when creating the I-cord for the head/body section, but only 3-pegs were used for the I-cord arms. After the three main pieces are joined to form the angel, a small piece of silver pipe cleaner is shaped into a halo and attached to her head. Finally, Belle "gets her wings," which were made from 2½ inch wide sheer wired wedding ribbon. The 3½ inch piece of wired ribbon is pinched together in the middle and tied to her back using the gathering yarn from her waist. This is a very general description of how Belle is made. I am putting the finishing touches on the pattern and will be adding it to my Pattern Box on the right side bar over the weekend.

Also, I have completed several other Christmas tree ornaments: mini & micro stockings, candy canes, I-cord wreaths, and a mini snowman, but I just had to post an entry for Belle first. I am currently working on a loomed snowflake, poinsettia and a large angel made on the blue Knifty Knitter which can be used either as a tree topper or a decorative centerpiece. In addition to the little stuff, I have two large Christmas stockings waiting to have names embroidered on them and several Christmas hats in the works. So much to do, so little time.

Wednesday, November 29, 2006

Wonderloom meets Boo-Boo Bear

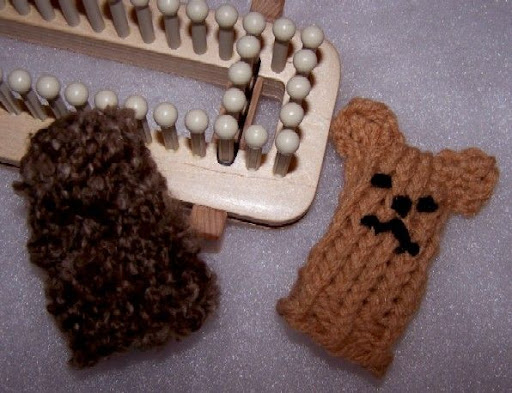
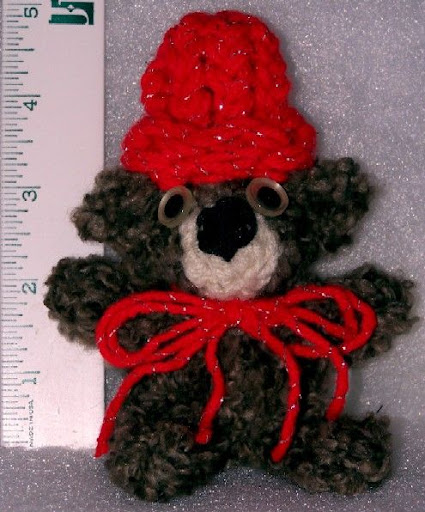
Wonderloom….the name rings of fantastic endeavors in loom knitting: magnificent afghans, unique sweaters, designer hats and scarves. So, what’s the first thing I wanted to create on this magnificent Cadillac of looms? Well, I have a dark secret that I’ve never told anyone. Ever since I first saw some tiny little knitted finger puppets in a basket near the check out counter of a local book store many years ago, a flame was lit inside me to learn to knit just so I could unravel the mystery of these tiny creations. However, the gauge of the Knifty Knitter looms was much too large for producing finger puppets, therefore, when I received the Wonderloom with a 3/8 inch gauge, I figured I would give it a shot. I even located a needle knitting pattern, called Finger Puppers, which I could easily transfer to the looms. Casting all sensibilities aside I bravely went were no knitter should go – I knitted without creating a gauge swatch (GASP). When I finished the body of my first finger puppet using 14 pegs on the Wonderloom, I immediately christened him, “Boo-Boo” Bear, the accidental test swatch. Poor Boo-Boo, the only person’s finger that he would ever stay on would have been a giant with a finger the diameter of two of my fingers and at 5 ft. 10 in. I’m not a small person. So, it was back to the knitting board, where I adjusted the Wonderloom down to 12 pegs (you have got to love the versatility of this loom) and knitted finger puppet number two. This time the finger puppet fit much better and looked more like the picture in the Finger Pupper instructions.
My only dilemma now was what to do with poor Boo-Boo: should I toss him in the garbage or do a make-over? Being raised not to waste anything, I opted for the make-over. I took the Knifty Knitter spool loom and created arms & legs; crocheted two ears and a muzzle; cut a knee-high hose to a shorter length, stuffed it with fiberfill and inserted inside Boo-Boo’s knitted body; finally all this was put together and stitched in place. His nose was embroidered and his white button eyes had black sequins glued to them. A yarn bow and hat which was made on the spool loom were added. Voilà, Boo-Boo Bear went from plain finger puppet to dazzling Christmas tree ornament, instant trash to treasure!

Sunday, November 26, 2006

The story of three little bells...


Once upon a time there were three little bells: Papa Bell, Mama Bell and wee little Baby Bell. A couple of weeks ago I knitted some bells using the Knifty Knitter flower loom. Recently, Kansas, another loomer, posted some mini bells on her Canadian Crafter blog that she created using her 8-peg thumb loom. Someone on the Knifty Knitter Yahoo Group asked where they could get a thumb loom like the one Kansas used to create her mini bells, so I decided to see if the Knifty Knitter spool loom would work for this project since I had one on hand.

The Knifty Knitter spool loom is a dual loom. On one end there are 8 regular sized pegs spaced ¾ inch from center to center of each peg. The other end features 5 small pegs spaced at approximately ⅝ inch from center to center of each peg. Since I was testing the 8-peg end of the spooler, I decided to try the 5-peg end, too. Here’s what I did:
  • Papa Bell The “Papa Bell” was made on the 12-peg KK flower loom following the directions in My Pattern Box on the right for Knifty Christmas Bells.
  • Mama BellThe “Mama Bell” was made similar to Kansas’s mini bell with a little variation at the top of the bell. Using 2 strands held as one on the 8-peg end of the KK spool loom, I did e-wraps and knit for 8 rows. On row 9 I did a flat knit stitch. On row 10 I decreased every other peg by combining the loops on pegs 1-2, 3-4, 5-6 & 7-8 (this leaves double sets of loops on pegs 2,4,6 & 8); and then did a flat knit stitch on the remaining 4 pegs. I did a gather bind off and finished the bell using the same method outlined in the instructions for the Knifty Christmas Bells.
  • Baby Bell
  • “Baby Bell” was done on the 5-peg end of the KK spool loom using one strand of yarn, e-wrap and knit for 6 rows. Rows 7 & 8 were done in a flat knit stitch. Finally, I decreased the pegs by placing the loop from peg one onto peg 2, then placing the loop from peg 3 onto peg 4 and leaving peg 5 as is. I used a gather bind off and finished similar to the instructions for the Knifty Christmas Bells, except I was working with only one strand of yarn instead of two.
The picture of the three bells shows the outcome and comparison in size of the bells. Height measurements are approximately as follows: Papa Bell – 3 inches, Mama Bell – 2¼ inches, and Baby Bell – 1¼ inches.